Sorry, but I can not continue to work on this tutorial, cause I have not enough time. Maybe I will go back and end with this a bit later.👋
You can find a project source at github.
Apparatus: Extended Guide
In this second tutorial, we will talk about using the Apparatus plugin inside Unreal Engine 5 in a deep. We will create a full fireman game. The goal of the player is to put out at least half of all the wood blocks until his house wouldn’t burn out. We will add music and other features like a menu, and finally, we will publish our mobile game on Google Play!
Just before going any further, make sure you have read (or saw) our previous tutorial.
Technical task
Before creating a new game, a developer should clearly understand the features he’s going to add to the product and the workload he’s going to implement. We will create a list of all our objectives, so everyone will know the purposes of the tutorial, but we will not do anything else that is not included in the list (to save our time):
- Create a menu with 3 buttons:
levels,settingsandquit. A button click should navigate the player to the according widget (except forquit, which must shut the game down). - Settings widget must contain 3 sliders:
- the volume of music,
- the field of view,
- the controller sensitivity.
- Plus the
backbutton that will navigate the player back to the main menu.
- In the
levelswidget, there must be 3 different levels. We will not save information about completed levels, so at the game first start, the player could select any level he (or she) wants. Click on the level button should immediately start a level.- Plus the
backbutton that will navigate the player back to the main menu.
- The level consists of different things, logics and mechanics:
- The player can move around by using a joystick. Also, there are buttons like
jumpandsnuff out. - The level is just a grass plain with a huge fence around and a wood building constructed with blocks at the center of the area.
- The player is spawned in the building on the most top floor. While the player is spawned, a random wood block is lighted it up.
- A Burning block causes nearby blocks to light up after several seconds of permanent neighborhood. Here some fire particles should be used.
- After several seconds of burning, the block will be destroyed, which could cause the building to collapse.
- The player should go through the building, find the epicenter of the fire and snuff it out.
- If a certain percent of all wood blocks are destroyed (say, 50%), then the level is failed, - we should show the fail widget to the player and navigate him (her) back to the main menu.
- The player should use the fire extinguisher to stop the fire, after several seconds of the using fire extinguisher on the block, the block will stop burning.
- If all blocks have stopped burning, then the player completed the level. Show the win-widget to the player and navigate him (her) back to the main menu.
- Music and sound design:
- There should be 1 main menu music, and one game (level) music.
- When the sound of fire kicks in (the player is close to the fire), then the level music is disabled (until the level end).
- There must be sound space, so the player can find the fire by listening to sounds.
- Finally, publish the game as a beta version on Google play.
Wood block parameters
Ignition factor- initially is set to0.0. Every tick the block is contacted with the burning one, this counter will be increased. After the parameter has reached the1.0value, the block become burning.Fire health- initially is set to100.0. While the block is burning, this value is decreased, so, when the counter reaches the0.0value, the block is destroyed. When there become many destroyed blocks, the level will fail (as described earlier).Extinguishing counter- the player can affect this parameter by using the fire extinguisher only when theIgnition factoris greater than0(so the player can snuff out only blocks that are going to burn). This value is initially set to0.0. Every tick the user use the fire extinguisher on the block, this value is increased, so, when it reaches the100value, the block is no more burning (i.e. if it was burning, then it stops, if it was not, then it will never start).
Project initialization
Before doing anything else, make sure you have Apparatus installed on your UE 5 (see previous tutorial for details). In this tutorial, we will use UE version 5.0.2, but you can actually use any 5.0+ version you already have, because they do not have significant differences.
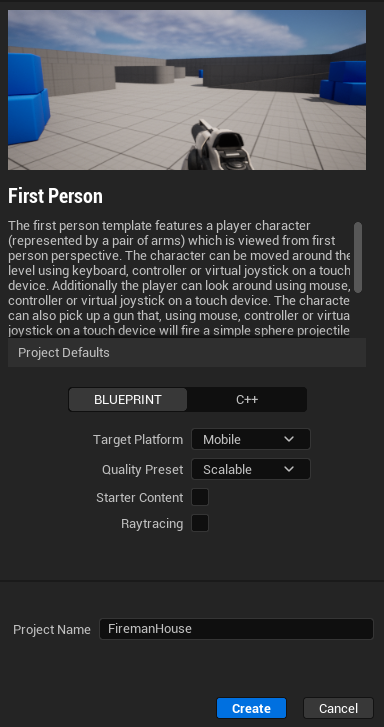
- Let’s create a New Project. Click the “Games” section on the left menu in Unreal Project browser. Select “FirstPerson” template, target platform should be “mobile”, let’s set the new project quality to “scalable”, disable “Started content” and name the new project anything you want, but we will use “FiremanHouse”, like this:
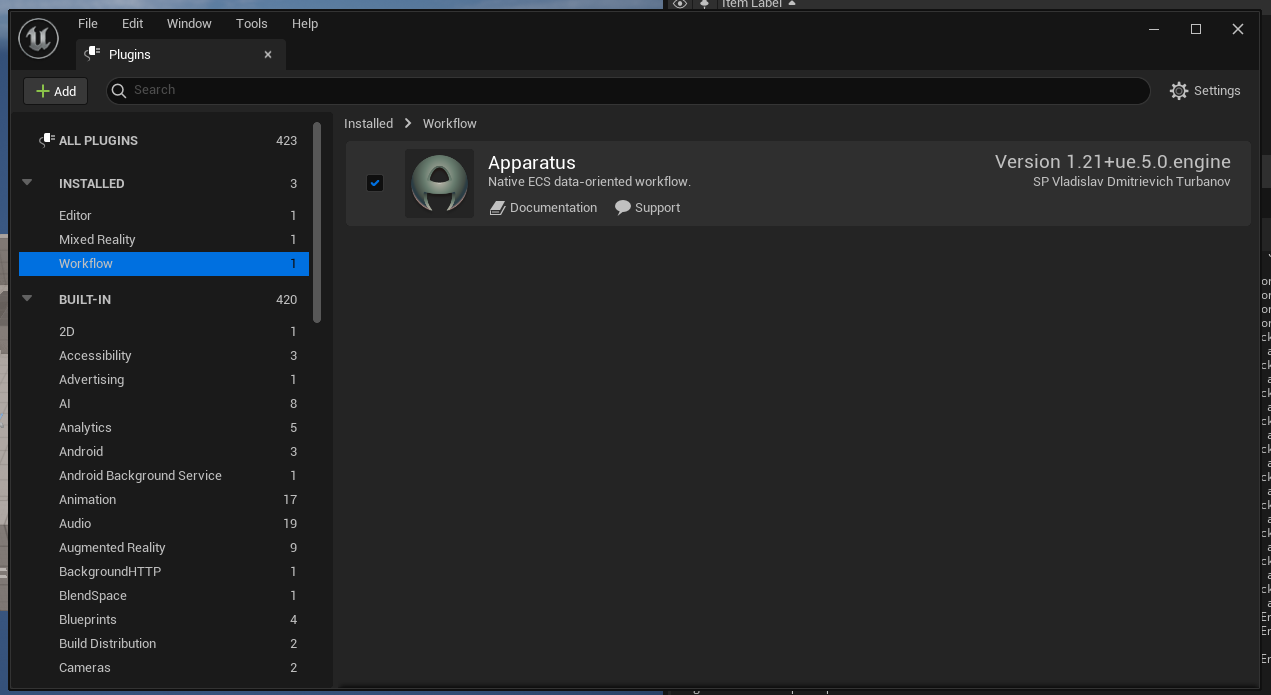
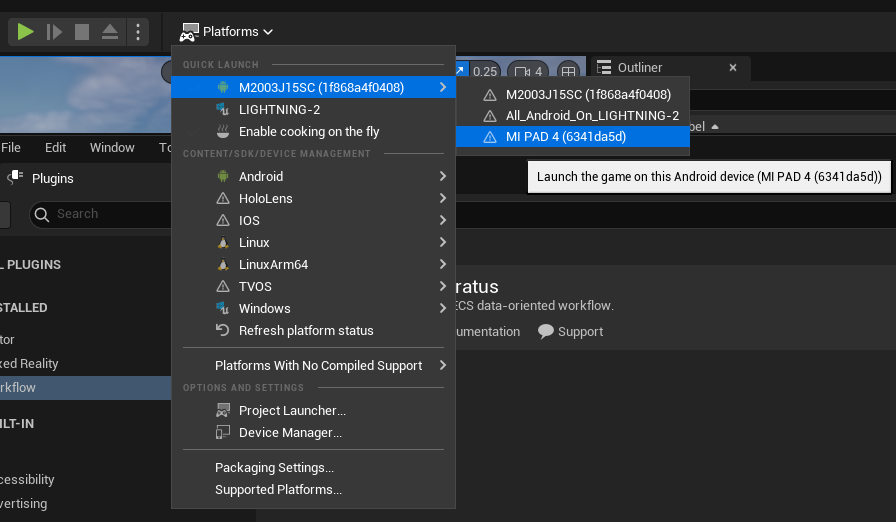
- After project creation, enable Apparatus plugin (via “Edit” → “Plugins” → “Installed” → “Workflow” → “Apparatus”, then restart Engine as it claims to). If you want to use your android phone for project test, plug it to the computer, enable USB debug, make sure that you have installed Android studio. Go to platforms and under the section “Quick launch” select the device you want the game to run on:
If you got the
java.lang.NoClassDefFoundError: Could not initialize class org.codehaus.groovy.vmplugin.v7.Java7error while launching the game on the device, then just go to the project settings and manually select thelocation of JAVAsetting to the location of JDK that was installed with your Android Studio (in our case it isC:/Program Files/Android/Android Studio/jre).
Creating background for main menu UI
Ok, the next step we need to implement is, obviously, the IU for players. Basically, we need to create the main menu, as described above. For the menu, we need several features:
- Logo of our game.
- The level for main menu. (actually, the background for the UI)
- HUD class object that will manage our widgets via Mechanism.
- 3 widget classes: for main menu itself, for settings and for levels.
- Settings must be stored across different levels, what can be achieved by using the
Game Instanceclass. So we need to create one.
In this paragraph we will complete tasks 1 and 2. Let’s pour in the development process by completing these several steps:
- Firstly, let’s pin the
Content Browserwindow and create a new level calledMain Menuin the new folder with the same name.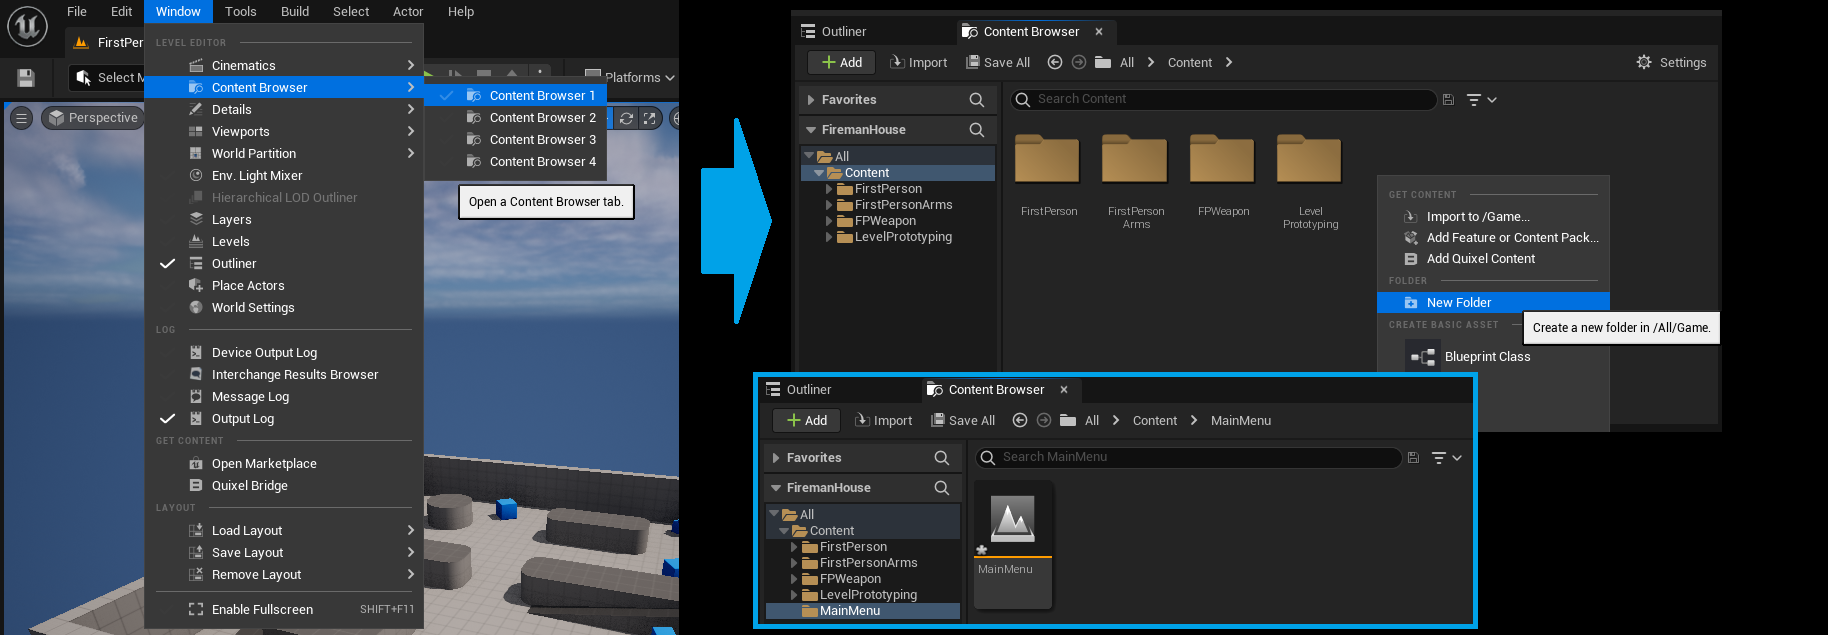
- Save created item and open it by double-click. If the Engine has asked you to select the content to save in a pop-up window, just click
Save selected. - The next thing we are going to do in a new level is to create a simple stone wall with the logo of our game. Of course, we will have to add some lighting to the scene. So, open any bitmap picture editor you have installed and create a simple logo for fireman organization, like this:
The output file extension should be
.pngor.jpg(not.svg). - Then, we need a material of wood, of stone and of grass. These materials are available in a Starter Content in every new Unreal Project. But we have disabled Starter Content, because its size is too big for a mobile game. So, to access the materials, we need to migrate these assets from another UE project, that has Started Content included. So, open your another UE project via UE Project Browser that has Starter Content. If you do not have any other UE projects with Starter Content, then just create a new one. We need to migrate several assets, that means, we need to select them what is not quite comfortable while searching. So, create a new folder called
ForMigratein the root folder of your project (we will delete it after this step). After that, openStarter Contentfolder. Search for each material in turn, drag & drop it to theForMigratefolder and selectCopy. The process should be like this: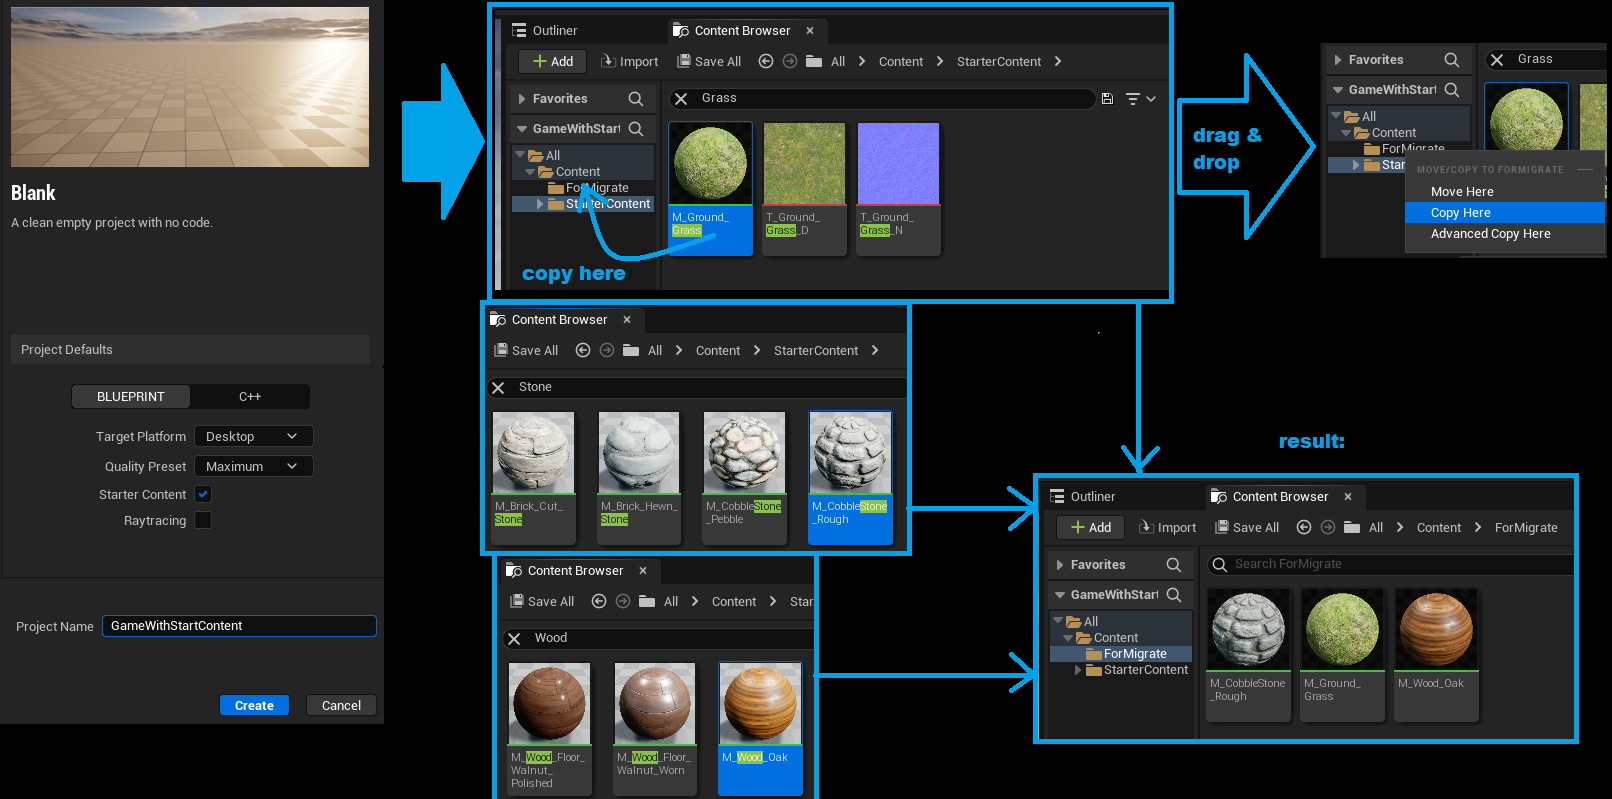
- Now go to the
ForMigratefolder and select all 3 materials. Right mouse button click → “Asset Actions” → “Migrate…”. The Engine will show you theAsset Reportwindow, so you can find the other items (textures etc.) that will be migrated with the assets. Just clickOKbutton. Then a new window will be opened, calledChoose a destination Content folder. Now we need to select a UE project that we need to migrate our assets to. To do it, you need to find a location of the tutorial project and navigate into its content folder. In our case, the correct location should beC:\Users\<UserName>\Documents\Unreal Projects\FiremanHouse\Content. Select this folder in your operating system file explorer. Engine will perform the migration and notify you about task result.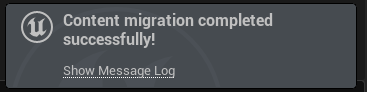
- Delete the
ForMigratefolder in the current project and navigate back to the tutorial project. In the “All → Content” folder, there must appearForMigrateandStarter Contentfolders. In the first one you should see the materials, but in the second one should appear textures. Like so: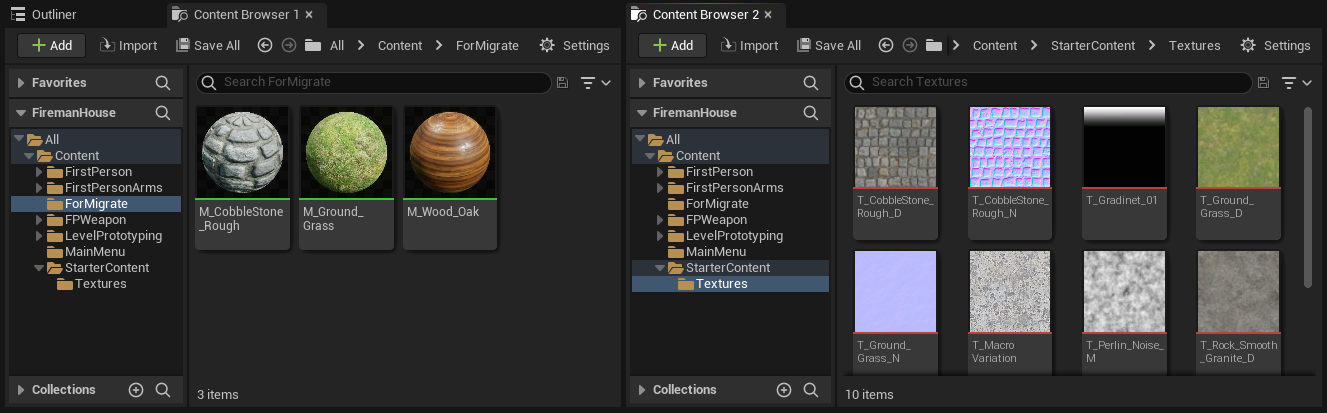
- Nice, we have just added some materials in our game, so, it is time to create a first scene for main menu. Before that, let’s select levels the Editor should use as a first game scenes. Go to the project settings and under the
Maps & modessection findDefault Mapsoptions. MakeEditor Startup MapandGame Default Mapto beMainMenu. Rename folderForMigratetoBasicMaterials. Run Ctrl+Shift+S to save the project settings. - Open the
MainMenumap. Open window Place actors via “Window” → “Level editor” section → “Place actors”. In the panel, selectShapeskit, so you can access different basic shapes likeCube,SphereorCone. Drag and dropCubeshape to the empty level. As there are no any lighting in the map, you will not be able to see it in the viewport (because everything is just dark). In thePlace actorswindow selectLightskit and addSpot Lightto the map. You can use Outliner window to select added cube or light source and a Details panel to manually set the location. We will use:- Cube relative location:
(X=-70.000000,Y=0.000000,Z=0.000000) - Cube relative scale :
(X=0.500000,Y=9.000000,Z=6.250000) - SpotLight absolute location:
(X=10.000000,Y=0.000000,Z=283.000000) - SpotLight absolute rotation:
(Pitch=-90.000000,Yaw=-107.002370,Roll=107.002370) - You can copy and paste this values from the tutorial text to your editor, like it was described in the first tutorial (see step 8)
- Drag and drop the
M_CobbleStone_Roughmaterial from theBasicMaterialsfolder in the Content Browser to the cube in the viewport. As you can see, the scale of the texture is a little huge. We will solve that by creating a new static mesh via Engine brush editing mode for geometry. So, firstly, in the viewport clickLitto select other view mode -Unlit. This will help you to see all objects on the map even without lighting. Then in thePlace actorswindow selectGeometrykit and add a Box to the map.Note: if you has selected the correct material in the Content browser before placing the box, the material will be applied to the mesh.
In the up menu in level editor change
Select Modeto the Brush Editing Mode. Then select box facets and move them to fit the geometry box to the scaled cube we have placed before. You can use details panel to manually set the location of the geometry box (just copy it from the Cube location data). After you fit the cube, delete the last one, but the geometry mesh should be converted to the static mesh via “Details Panel” → “Brush settings” → “Advanced” →Create static mesh. The Editor will ask you the folder for the new asset and the name for it. Just select Content folder in the project, but we will name the new static mesh asSM_WallMainMenu. Run Ctrl+Shift+S to save all changes. Go back to theLitview mode andSelect Modein your viewport to check for result.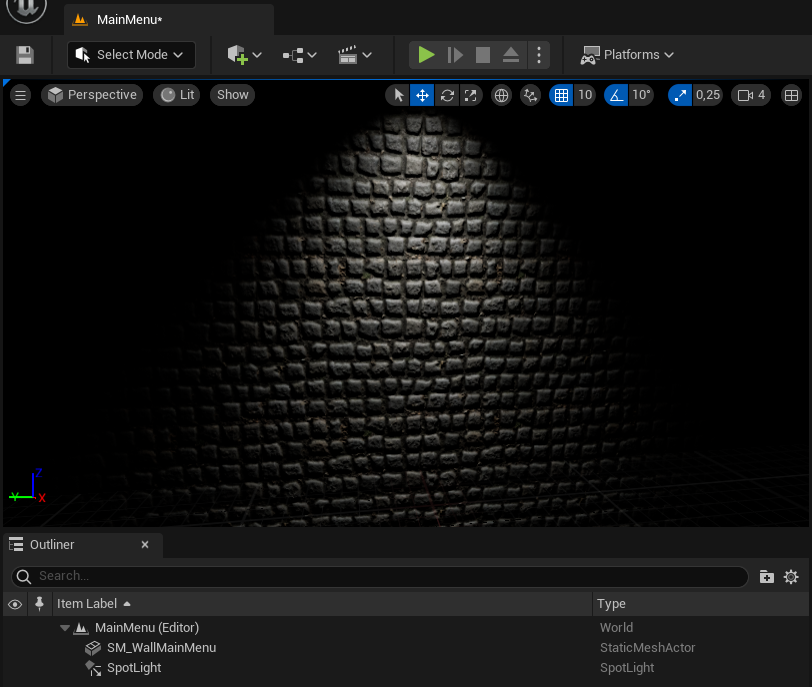
If you have any troubles in this step, just check our short video that explain, how to create a new static mesh via UE geometry.
- The
SM_WallMainMenuwill be used only in the main menu, so let’s move it to theMainMenufolder.When you move assets from different folders, Unreal Engine will generate so-called redirectors. While it is normal for them to appear in development build, you should avoid their existence in production build, that means, you should fix them. To find out all the redirectors in the project, go to the root (“All”) folder in the Content Browser and in filters select “Miscellaneous” → “Redirector”. After that you will be able to see redirectors in your project. Select them all, perform right mouse button click and select “Fix up”. You should fix up all redirectors before creating a product, as it also specified in Marketplace guidelines.
Perfect, now we need to add game logo to the wall. To do so, open the operating system file browser, navigate to the path, where the logo image is stored, and drag and drop the image file from the file browser to the Content Browser inside Unreal Engine to the
MainMenufolder. Rename added texture toT_GameLogo. Go toPlace Actorswindow and search forDecal Actor. Drag and drop it to the level scene. Next, we have to create a material for it. Navigate back to the Content Browser and perform right mouse button click on the logo texture. Select “Create Material”. Name itM_GameLogo. Double click on new saved asset to open material editor. Click on the result node of the material and in details panel select material domain to theDeferred Decal. Make Blend Mode to beTranslucent. ConnectRGBoutput of the texture to theBase Colorof the result node, but theAoutput (alpha-channel) to theOpacityparameter, as so: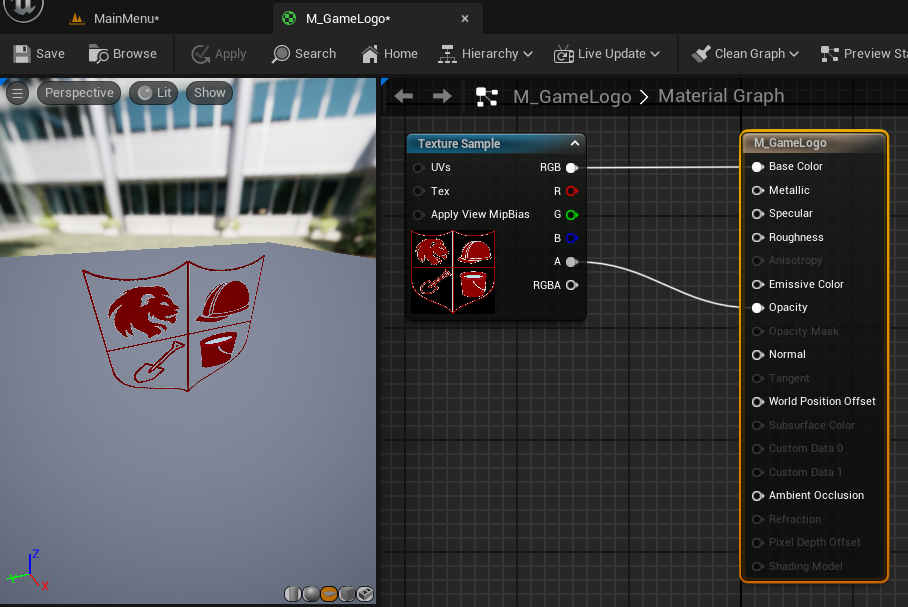
- Save and apply the material. Go to the Content Browser and select the material
M_GameLogo, then select the decal actor on the map, go to its details panel and under theDecal materialoption click theUse selected asset from Content Browserbutton. Locate the decal actor correctly, so it will be placed on the wall, like this: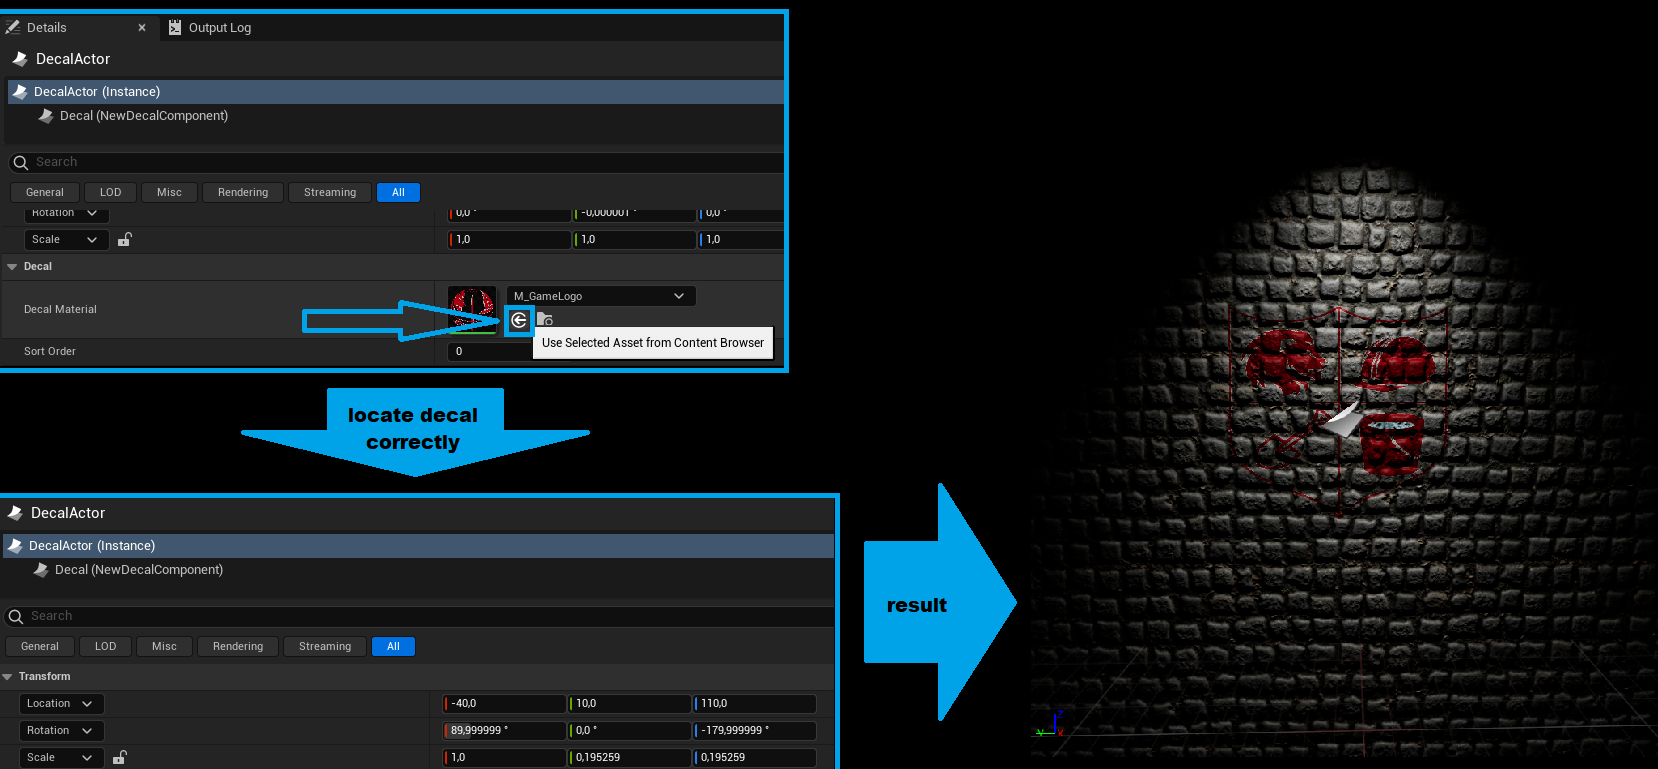
- Location:
(X=-40.000000,Y=10.000000,Z=110.000000) - Rotation:
(Pitch=0.000000,Yaw=-179.999999,Roll=89.999999) - Scale:
(X=1.000000,Y=0.195259,Z=0.195259)
- Now we have a complete background for the UI. Move the viewport view as needed, because we are going to create a camera. When you found a perfect view for the background, click on the upper-left button with 3 sticks in the viewport and select “Create Camera here” → “CameraActor”. In the details panel search for activate options and for
Auto Activate for PlayerselectPlayer 0. Here we will also enableAuto Activatein the Activation section.- Camera Location:
(X=325.000000,Y=0.000000,Z=140.000000) - Camera Rotation:
(Pitch=-5.000000,Yaw=-180.000000,Roll=0.000000)
UI basic logic
Here we will solve other steps that were introduced in the paragraph above. We need to create 3 different widgets and animations for them. All the widget manipulation will be done via special HUD class. So:
- Go to
MainMenufolder in the Content Browser and create a new HUD class (derived fromHUD). Name itBP_MainMenuHUD. Click on the diagram-like button on the up Editor menu, under “World Override” go to the “Game Mode: Not overridden!” option, select “Create” → “MechanicalGameMode”.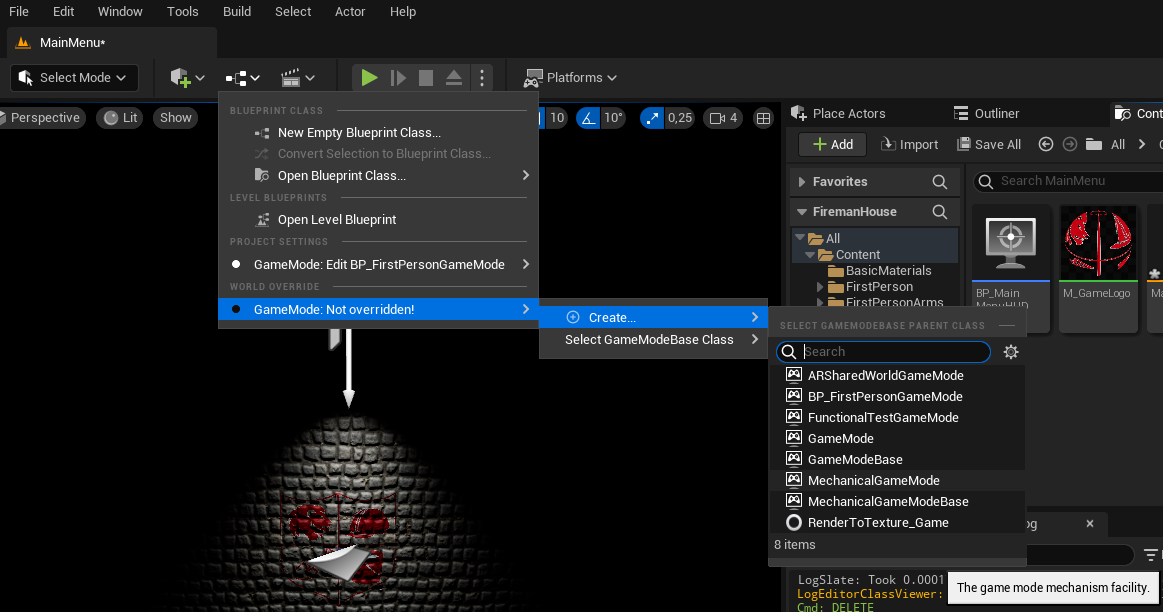
- In the pop-up window name new created blueprint like
BP_MenuGameModeand place it underMainMenufolder. In the opened BP Editor navigate to Class defaults and makeHUD Classoption to beBP_MainMenuHUD, butDefault pawn classto bePawn.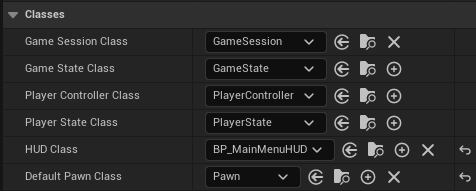 Then go to the graph editor and disable joystick like so:
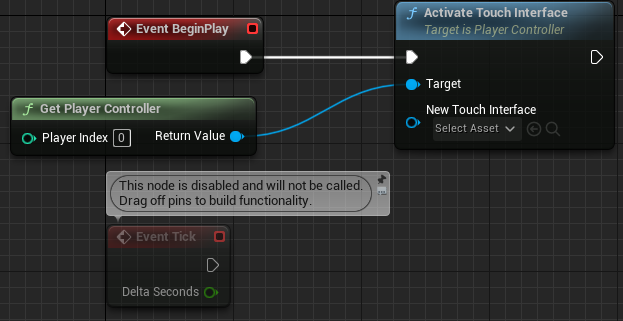
- Now we need to add animation of light source swaying. We will perform this logic in the GameMode BP using ECS. Go to the level editor, select
SpotLightobject and add aSubjective Actorcomponent to it via details panel. Create a new detail BP calledD_Swayingin theMainMenufolder. In the details panel of recently added subjective component add this detail to the spotlight.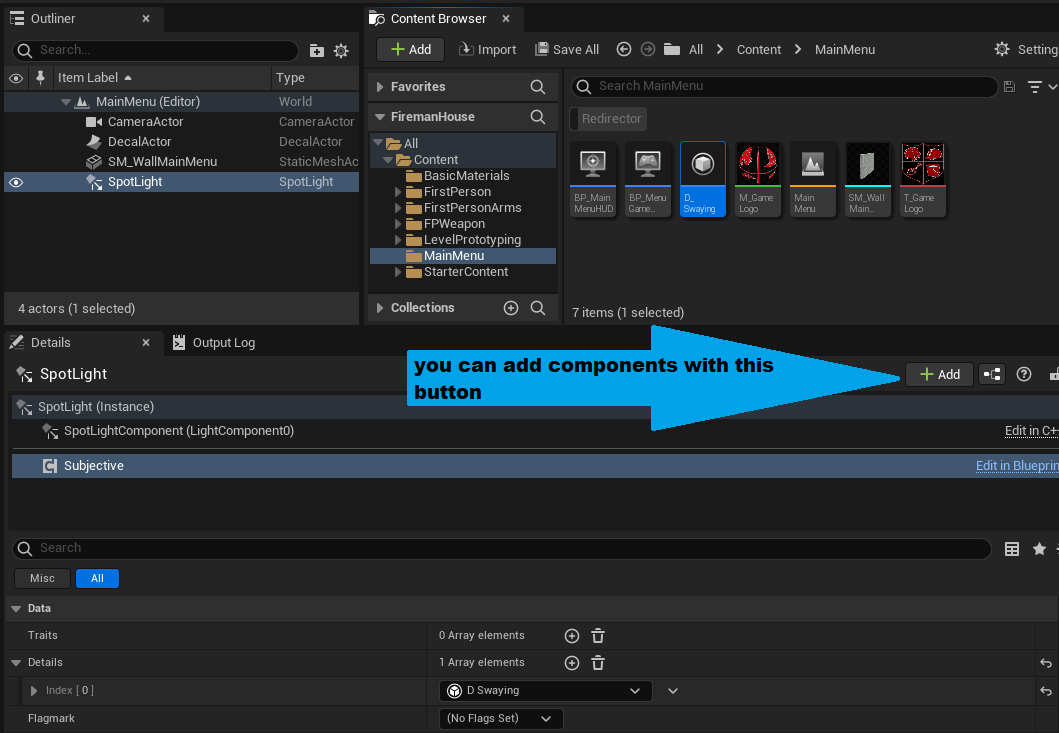
- Next, select SpotLight actor and make it moveable via details panel. Go to the newly added detail BP editor and add some variables:
Originalof type “Rotator” with “Instance editable” flag enabled.Amplitudeof type “float” with “Instance editable” flag enabled.Speedof type “float” with “Instance editable” flag enabled.CurrentAngleof type “float” (without “Instance editable”).You can add description to every new variable.
Original- is the premier rotate parameter of the spotlight,Amplitudeis the maximum angle of which we will rotate the light source,Speedvariable define, how fast the swaying would be, but theCurrentAngleis the current state of rotation.
- We will perform the rotation logic like so:
CurrentAngleis the value in degrees of the angle in the unit circle. Every tick this value is increased bySpeedparameter multiplied by DeltaSeconds. To get the rotation of each tick, we need to get theRollandYawattributes from theOriginalstructure, but thePitchparameter will be achieved by the math function:Original.Pitch + Amplitude * sin(CurrentAngle). Easy though? So let’s create a few simple functions in the detail Blueprint:Calculate Next Angle: Increase aCurrentAnglevalue bySpeedmultiplied byDeltaSeconds. If new value is greater then360.0, then turn it back to that range. The function must obtain theDeltaSecondsvalue as float argument.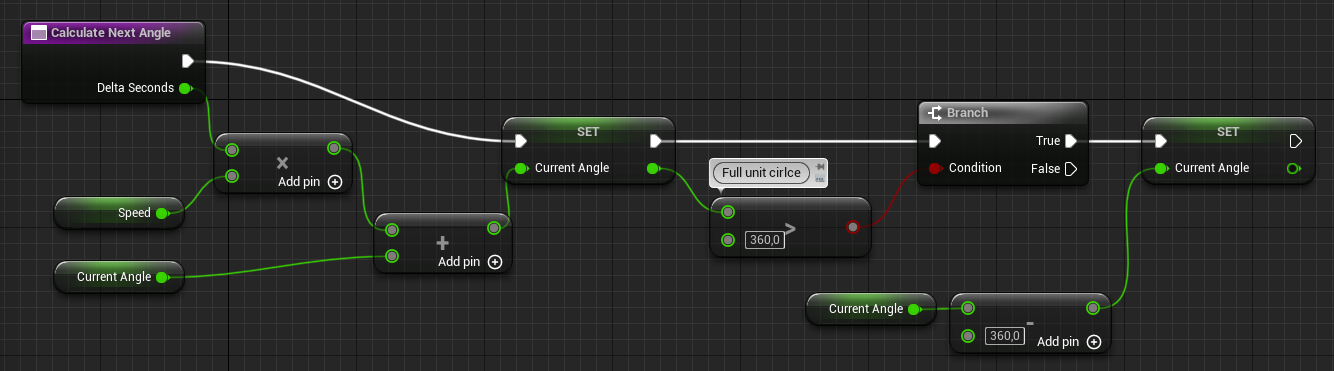
GetPitch: perform the math function above. It will calculate a current pitch based on the values ofOriginal,CurrentAngleandAmplitude: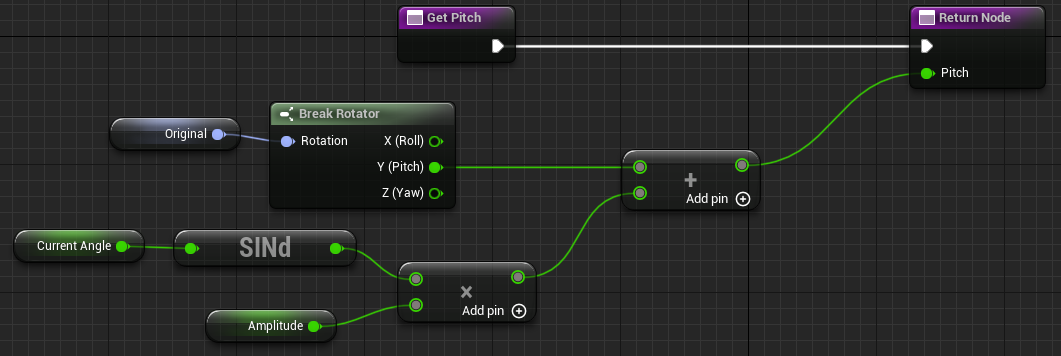
GetNextRotator: the pure function that will use previous helpers to return a full rotator that the actor should be set to. Function must obtain theDeltaSecondsvalue as float argument: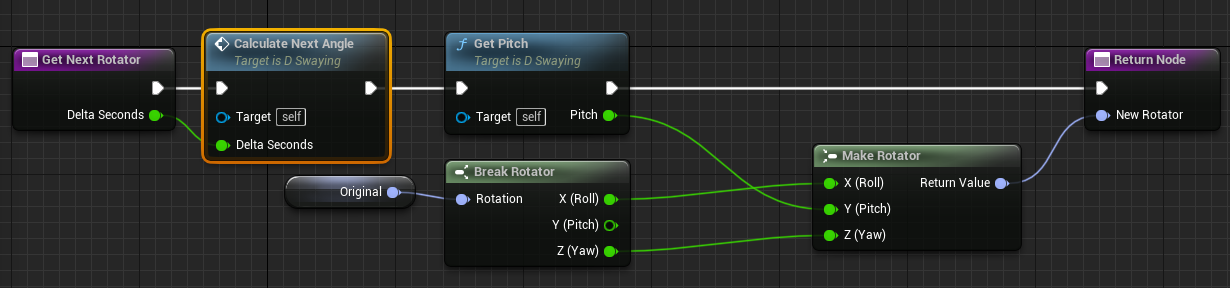
- Please, make
GetPitchandCalculate Next Angleto be private, but theOriginalvariable to be “Blueprint Read Only”.
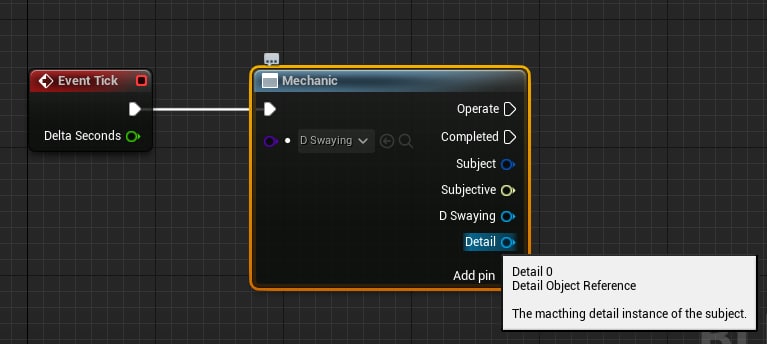
- Now let’s navigate to menu GameMode and in event graph write down our mechanic. To do so, drag pin from
Event Tickand create a new node -Sequence. Find out the mechanic BP node and connect them. ClickAdd pinand in detail field selectD_Swaying. Next, we need to get Actor reference from Subjective interface and if it is valid, then just set its rotation by usingSetActorRotationnode (Teleport physicsflag may be empty). As you remember, the functionGetNextRotatorrequireDeltaSeconds. The last value can be accessed fromEvent Tickevent. Promote it to variable, so you will not get spaghetti BP. The full GameMode Blueprint must be like this:
It is worth to check for the actor validity, because the
D_Swayingdetail can be added to non-actor Subjective.If you have some strange extra pins on the Mechanic node like this:
 Then try to reload Unreal project.
- Go to the level editor and set up detail in the SpotLight accurately:
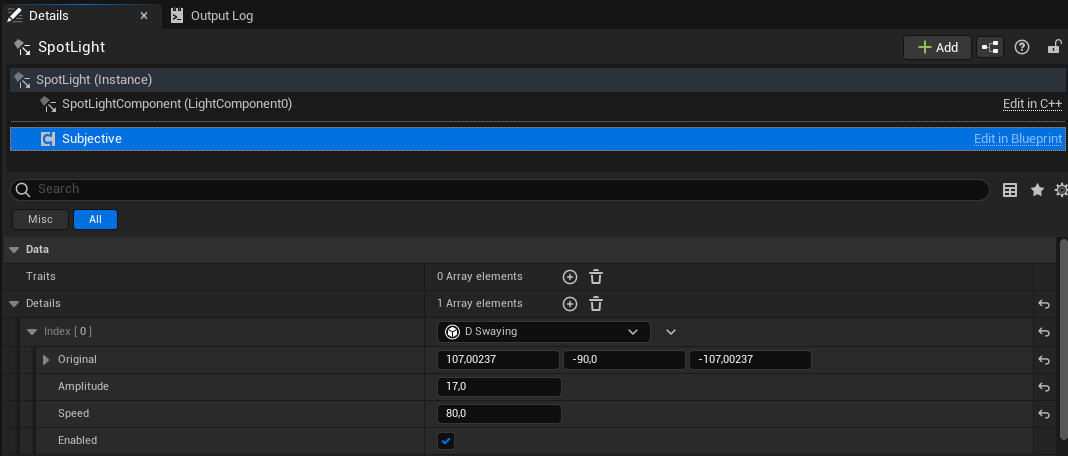
- Original rotator:
(Pitch=-90.000000,Yaw=-107.002370,Roll=107.002370)(The same as SpotLight absolute rotation); - Amplitude:
17; - Speed:
80.
- Go to the project settings and in
Supported Platformsremove all flags except for Android. FindSupport Movable SpotlightsandSupport Movable SpotlightShadowssettings and enable them both. - Launch your game on the Android device (if you have one).
Here are some advices of how to launch the game on the real device, because sometimes this step is just a headache for developers:
- Before launching on the device, reopen your UE in administrator mode, as it mentioned here.
- To ensure that your device is connected to the computer, open cmd and run
adb devices. You should see your device and its id in the output. The last command is included in Android Studio platform-tools, that is can be located in the pathC:\Users\<UserName>\AppData\Local\Android\Sdk\platform-tools. Use short USB cable, because long USB cables often useful only for device charging, not for gadgets connection. - Go to the Android Studio SDK manager and install
Android 10.0+ (R)(that is API version of 30) orAndroid 10.0 (Q)(API 29) and uninstallAndroid API 33. - In UE projects settings find
Android SDKsection and set these settings:SDK API levelto29andNDK API leveltoandroid-29(as it suggested here). - Go to UE project settings and configure your project for android.
- To solve
Failed to open descriptor fileerror, you can try to create a build and install the game withbat-script. - Check your device API level with CPU-Z application.
Our result:
Creating Widgets
- Ok, now we need 3 different widgets for main menu, settings and level picker. Let’s create the first widget in
MainMenufolder. Click theAddbutton with the green plus sign and selectUser Interface → Widget Blueprint. In the pop-up windowPick Root Widget for New Widget BlueprintexpandAll Classesand selectSubjective User Widget. We will use Apparatus to handle widgets switching. Name the new widget to beWBP_MainMenu. Run Ctrl+Shift+S to save all. - Open the widget editor. Search for the
Horizontal Boxin the widgets palette. Drag & drop it to the root item ([WBP_MainMenu]) in theHierarchy. For now you should be able to see the borders of the widget. In the palette search forSpaceritem. Add two of them to the horizontal box. Search forVertical Boxand add it between spacers in the horizontal box. Then select three added items (2 spacers and 1 vertical box) in the hierarchy and in details panel inSlot (Horizontal Box Slot)section makeSizeparameter to beFillinstead ofAuto. Now we need to add 4 spacers and buttons between them to the vertical box. Select 7 added items and, again, makeSizeparameter to beFillinstead ofAuto. Select the first one spacer in vertical box and name it something likeHeadSpacer. In the details panel you will see the float value near to theSizeparameter inSlot (Vertical Box Slot)section. Make it to be3.0. Then rename each button to the correct name, for example,Levels,Settings,Quit. Add text element to each button with the proper text value (seeContentsection in details panel). Select all 3 added text items and make theirColor and Opacitycolor to be black (seeAppearancesection). Save and compile the widget. Try to resize screen in the viewport so you will see that the widget we created is adaptive for any screen size. Here is the result of our configuration: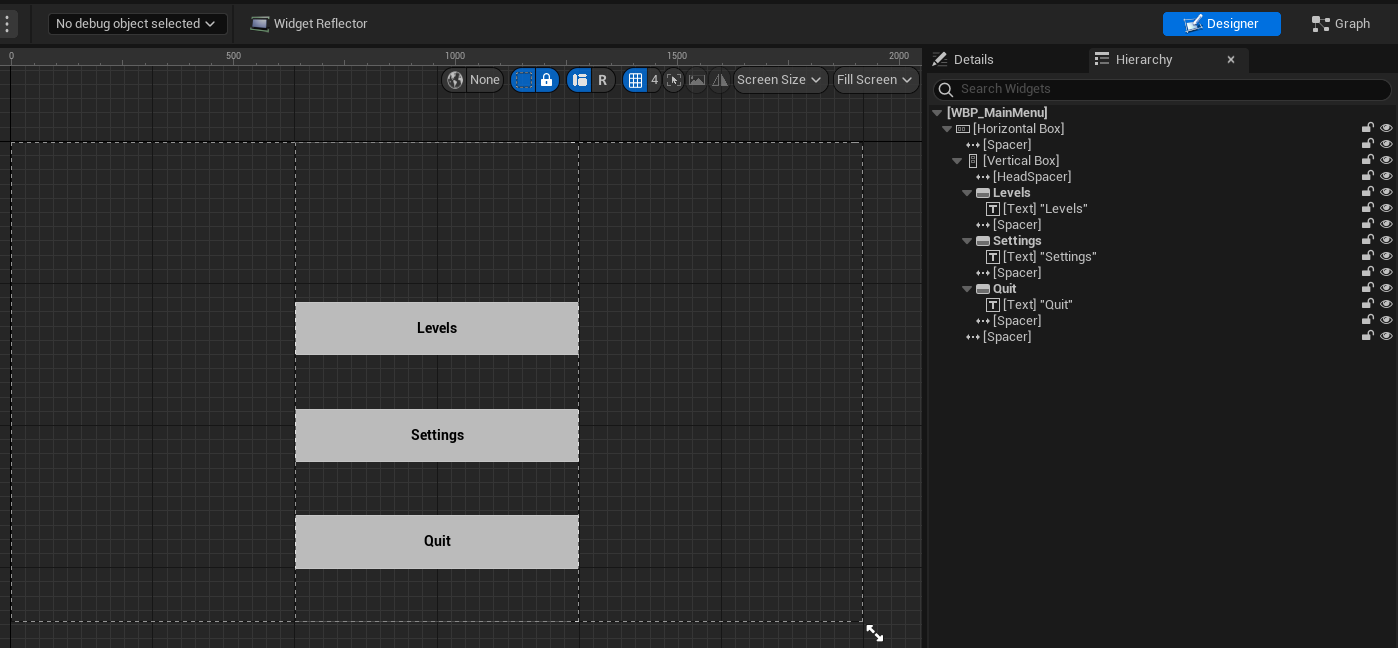
- Perfect. We will customize our appearance to be a little unique in the future, otherwise any player will find that the game is created with UE (because of buttons shapes and the default text font). But now we will create some logic for the widgets. In the opened widget go to the graph editor and check that you can access button variables.