Это старая версия документа!
Apparatus: Введение
В этом непродолжительном уроке мы поговорим о использовании Apparatus-плагина в Unreal Engine. Вы создадите свою первую деталь и научитесь реализовывать игровую логику в специально отведённом Blueprint-классе. Здесь продемонстрированы самые главные особенности работы с плагином на примере простого двумерного платформера.
Для дальнейшего чтения необходимо понимать базовые концепции ECS-подхода. Для этого есть наша краткая справочка по ECS.
Установка плагина и активация
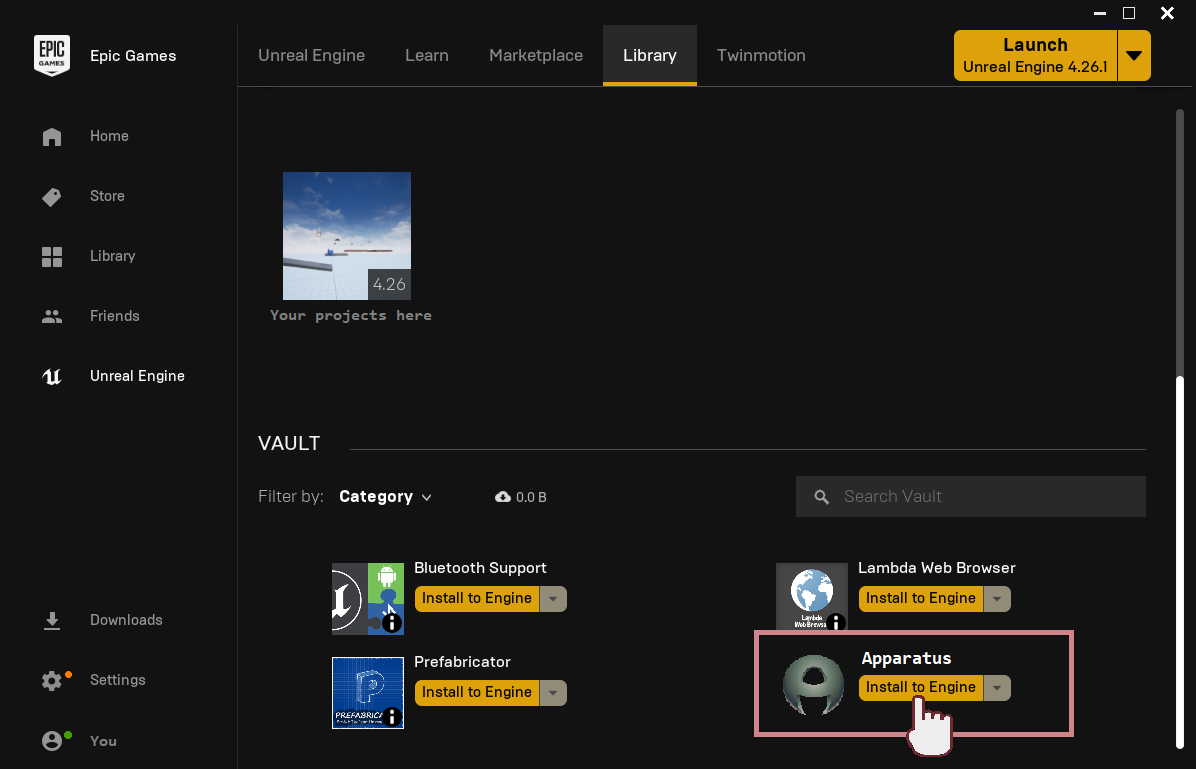
- Перед тем, как создать новый проект, Вам потребуется добавить плагин к игровому движку. Чтобы это сделать, пожалуйста, загрузите Epic Game Launcher, в левом меню выберете Unreal Engine, затем в верхнем меню - Библиотека. Промотайте вниз и под секцией „Хранилище“ найдите плагин Apparatus с жёлтой кнопкой „Установить на движок“. Клик по кнопке, чтобы начать установку.
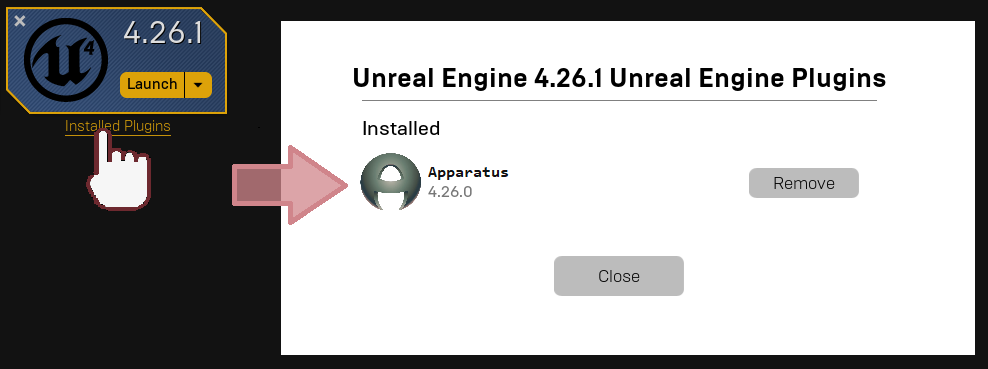
- В открывшемся окне необходимо выбрать версию Unreal Engine. Обращаем внимание, что, на настоящий момент, официально поддерживаемые версии - 4.26.1 и выше. После клика по „Установить“ подождите пару минут, пока загрузчик встроить код плагина в движок. Когда установка завершилась, можно проверить её успешность кликом по „Установленные дополнения“ под версией движка.
Создание проекта
- Теперь надо создать новый проект. Выберете пустой шаблон, так как в этом уроке мы всё настроим с нуля. Остальные опции можно оставить без изменений. Мы назовём модельную игру «ApparatusLearn», ну а Вы можете использовать любое имя, какое нравится.
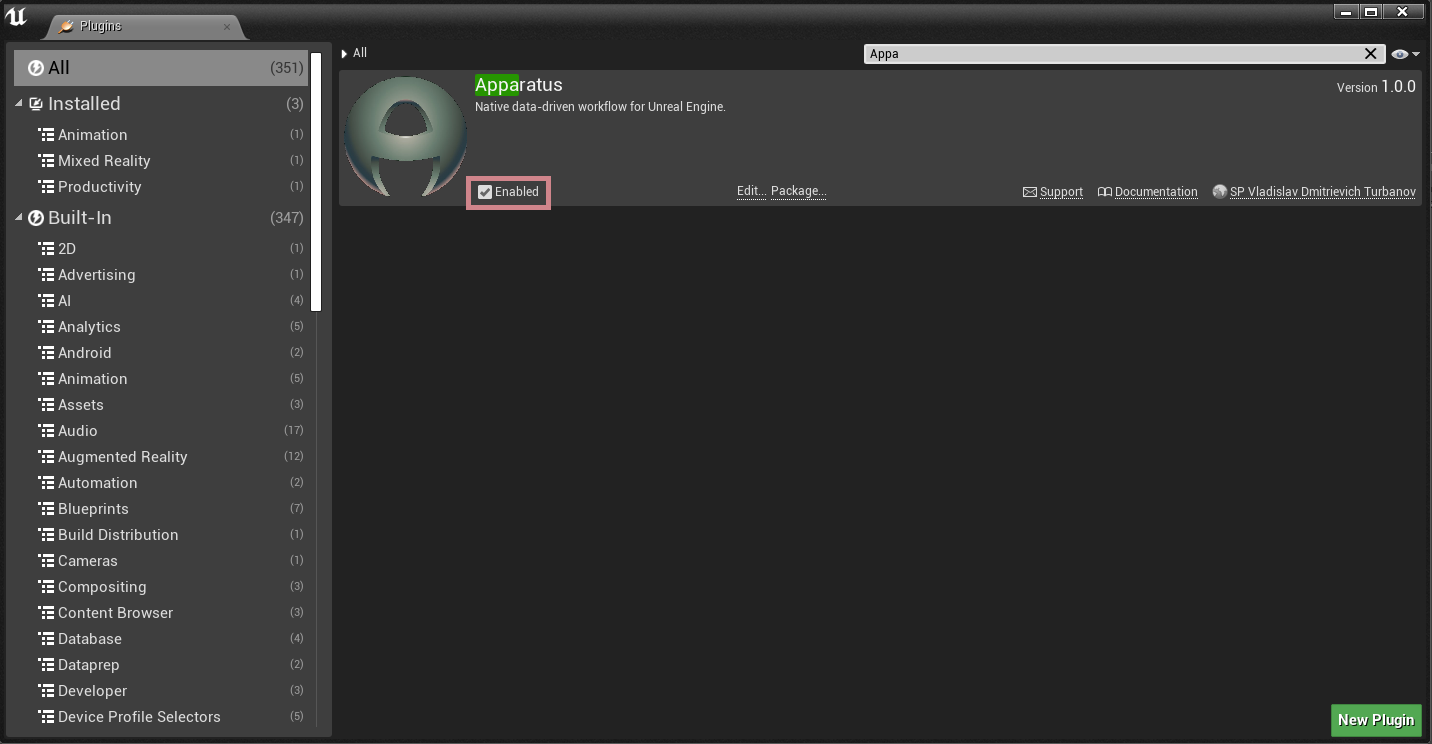
- Когда проект создался и открылся, можете проверить, выбран ли плагин в настройках. Для этого в верхнем меню выберете „Edit“ → „Plugins“. Затем напечатайте „Apparatus“ в строке поиска (или промотайте вниз до „Workflow“ секции). Убедитесь, что галочка „Enabled“ установлена:
Начало работы с плагином
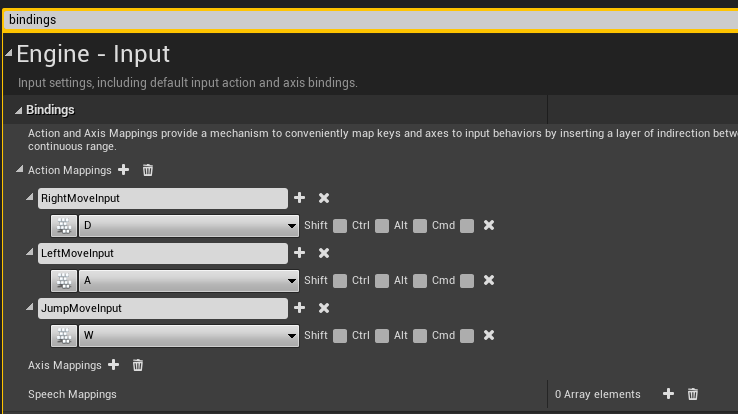
- Хорошо, перво-наперво нам предстоит добавить привязку клавиш, чтобы понимать, когда надо добавлять необходимые детали к Actor“у. Чтобы это сделать, перейдём в „Edit“→„Project Settings“ и печатаем „bindings“. Найдём секцию „Action Mappings“ и в неё добавим следующие клавиши:
- „RightMoveInput“ – D на клавиатуре
- „LeftMoveInput“ – A на клавиатуре
- „JumpMoveInput“ – W на клавиатуре
- Результат должен получиться примерно следующим:
- Мы начнём с создания новой „пешки“ (Pawn Blueprint). Для этого нажмём зелёную кнопочку „Add/Import“ в Content-браузере. Выберем „Blueprint Class“→„Pawn“ и дадим ему имя „BP_MainPawn“ (подробнее про именование ассетов можно посмотреть в стиль-руководстве). После создания нового блупринт-класса, прожмите Ctrl+S, чтобы сохранить только что созданный объект. Теперь двойным нажатием по иконке откроем редактор блупринтов (если Вы в первый раз сталкиваетесь с Content-браузером, советуем проверить официальную документацию движка). Переходим в Event-граф и удаляем все ноды через Ctrl+A и Del. В дальнейшем подразумевается, что Вы знакомы и с редактором Blueprint'ов; далее - BP).
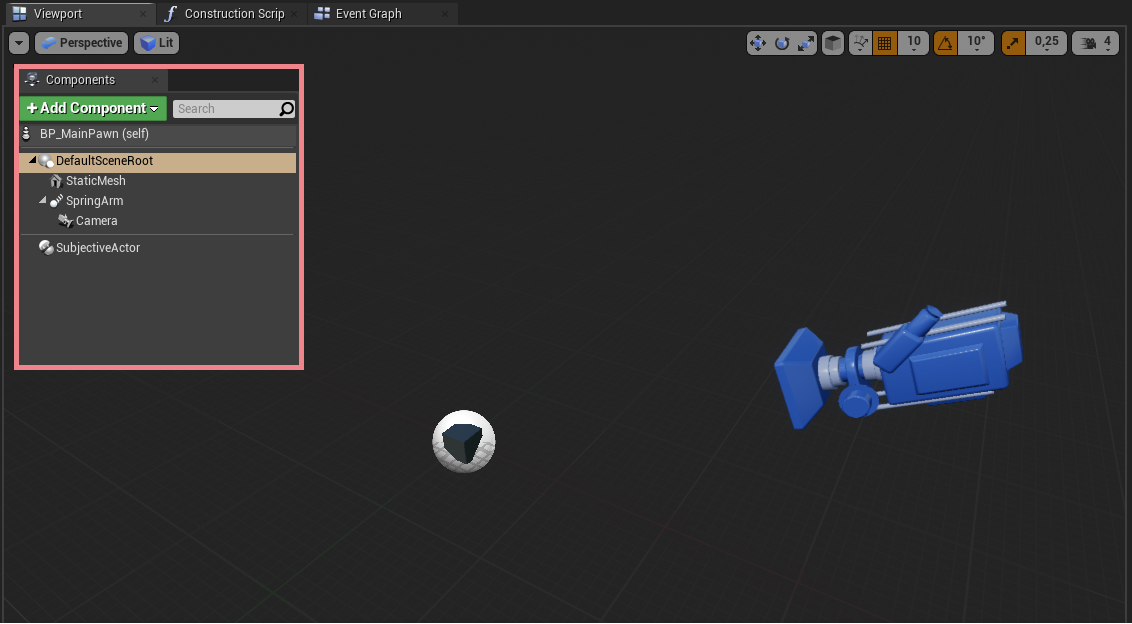
- В редакторе BP перейдём в Viewport и к списку компонентов класса добавим „StaticMesh“. В панели деталей справа для „Static Mesh“-свойства выбираем „Cube“ mesh-ассет. Чтобы пешка выглядела более приятной, для „Element 0“ свойства выбираем материал „BrushedMetal“. А сейчас добавьте „Subjective Actor“ компонент (предоставляемый Apparatus“ом) к нашей пешке и посмотрите в панель деталей, чтобы ближе познакомиться с новым Actor-компонентом. В этом уроке нам потребуется только свойства под секцией „Details“:
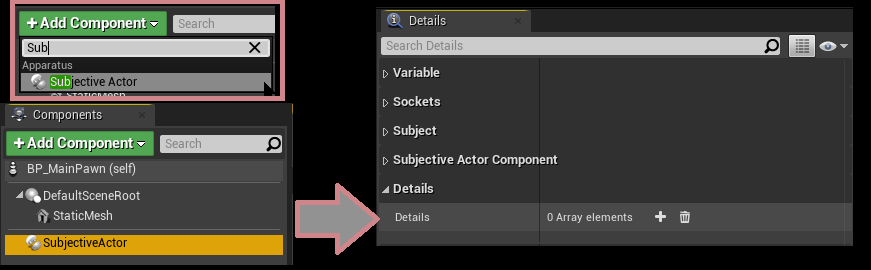 Как Вы уже догадались, детали мы будет помещать и настраивать именно здесь.
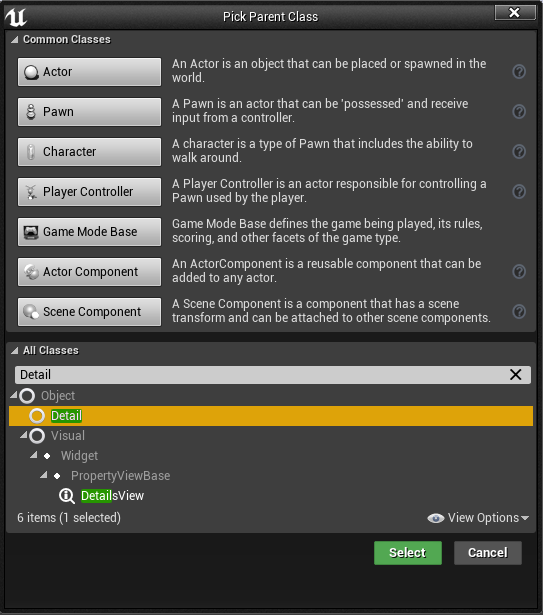
 - Ctrl+Shift+S чтобы сохранить всё, и скомпилируем BP. Вновь откроем Content-браузер и создадим новый BP, но на этот раз раскроем панель „All classes“ и найдём там класс „Detail“:
 Вы можете также создавать детали через „Create Advanced Asset“ секцию в меню Content-браузера (правой кнопкой мыши по пустому месту в папке):
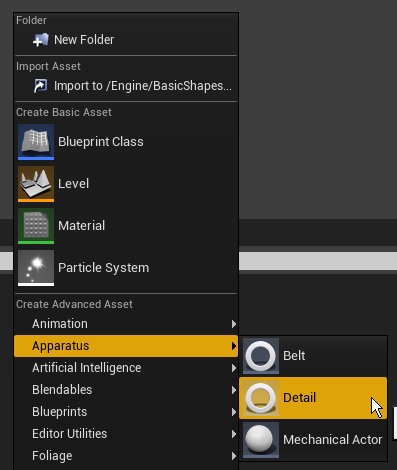
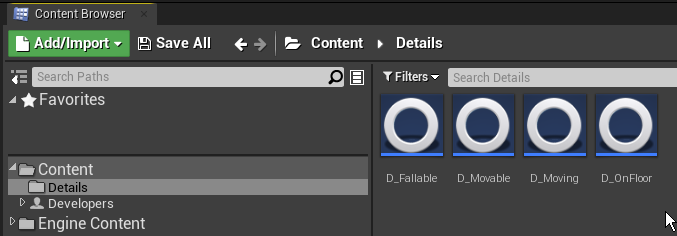
- Вообще говоря, Вы можете создать сколько угодно деталей, но для нужд этого туториала пригодятся следующие:
D_Moveable,D_Moving,D_OnFloor,D_Fallable.
- Keep your project organized and move all the Details classes to some folder called „Details“.
 Open any detail you want in the BP Editor. As you can see, Apparatus“ detail is actually a usual Blueprint class, inside which you can declare variables, macros and functions as you please. There are also two events that you can override („Activated“ & „Deactivated“) which are called when the detail“s Boolean state „Enabled“ is set to either true or false. In the corresponding details add next variables:
- Float „Speed“ to the
D_Moveableclass with a default value of100.0. - Editable enum
ETouch Swipe DirectionnamedDirectionto theD_Movingclass. - Editable & exposed on spawn Box Collision Object Reference named „Bottom“ to the
D_Fallableclass.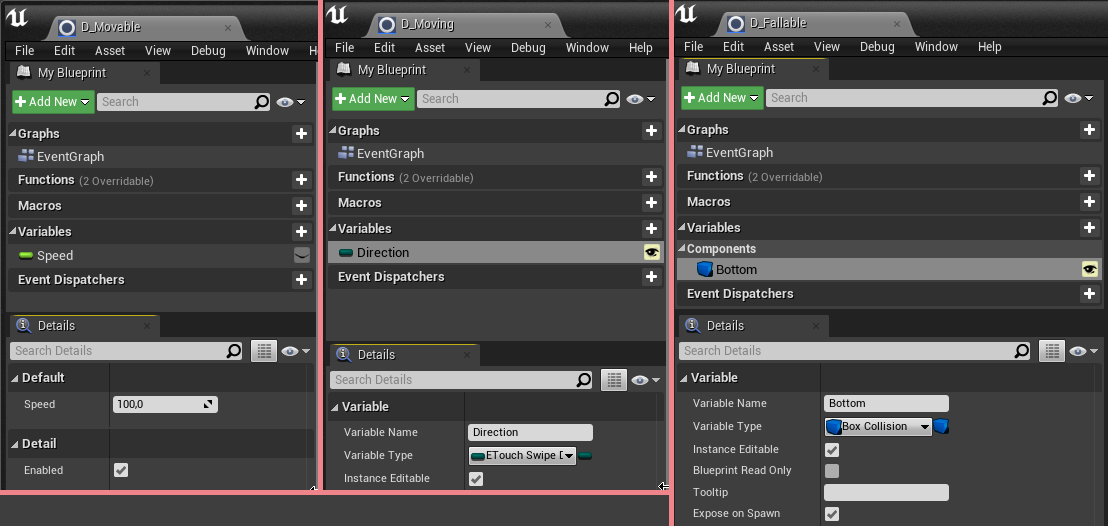
- Go back to the „BP_MainPawn“ blueprint and make the cube a little smaller (say,
(0.25, 0.25, 0.25)on a vector scale). Add a „Spring Arm“ component to the „DefaultSceneRoot“ and the Camera to the arm (make sure that transform vectors are set to their default values); then rotate the arm over the Z-axis by 180° and after that rotate it over the Y-axis by -30°. - In the result you should get something like that:
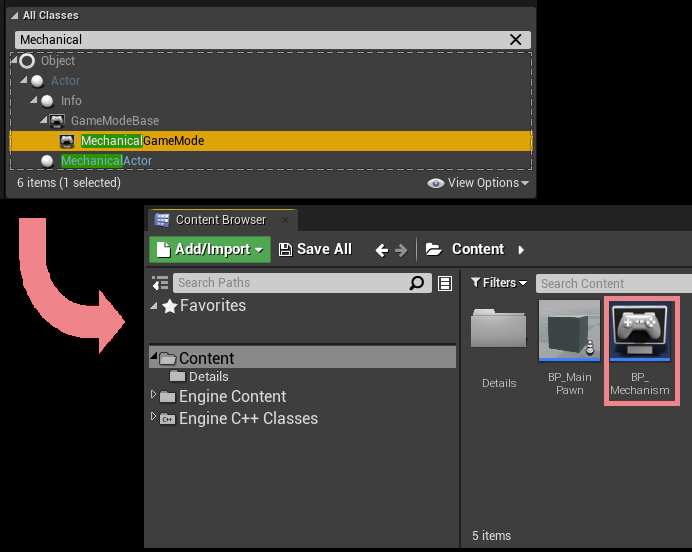
- Create a „GameMode“ (or a „GameModeBase“) class inherited from „MechanicalGameMode“ (or „MechanicalGameModeBase“) and name it something like „BP_Mechanism“. Like so:
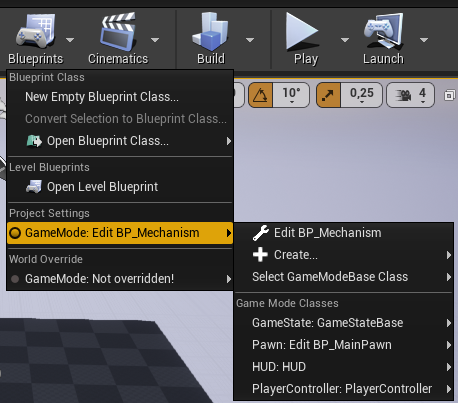
- Open „BP_Mechanism“ in the Blueprint Editor and in the Details Panel set the „Default pawn class“ value to „BP_MainPawn“. Go to the level settings: „Blueprints“→„Project Settings : GameMode“ and select „BP_Mechanism“ as the project“s main „GameMode“ class:
- Now, if you run the game, you will notice that the camera is actually working, but the cube won“t move while pressing the aforementioned A, D, W keys. Let“s fix this. First, jump to „BP_MainPawn“ and in the components list select the „SubjectiveActor“ component to see its properties in the Details Panel. For the „Details“ property add a new detail by clicking on the
+button and selecting the detail class. Add exactly two details like on the following shot: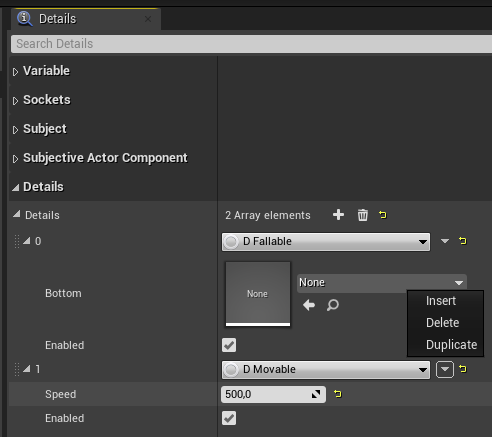
- As you see, you can easily add or remove details from the „BP_MainPawn“ actor component; it doesn“t actually matter how they are exactly ordered. You“re also able to see the variables of the details and change their default values. Note that if you change the value of the „Speed“ in the list, for example, it won“t be changed in the „BP_Moveable“ class itself, because here in the list the instances of the detail classes are presented while in the Blueprint Editor of the „BP_Moveable“ class you can change the global default values for its properties. Change the speed right here in the list to 500.
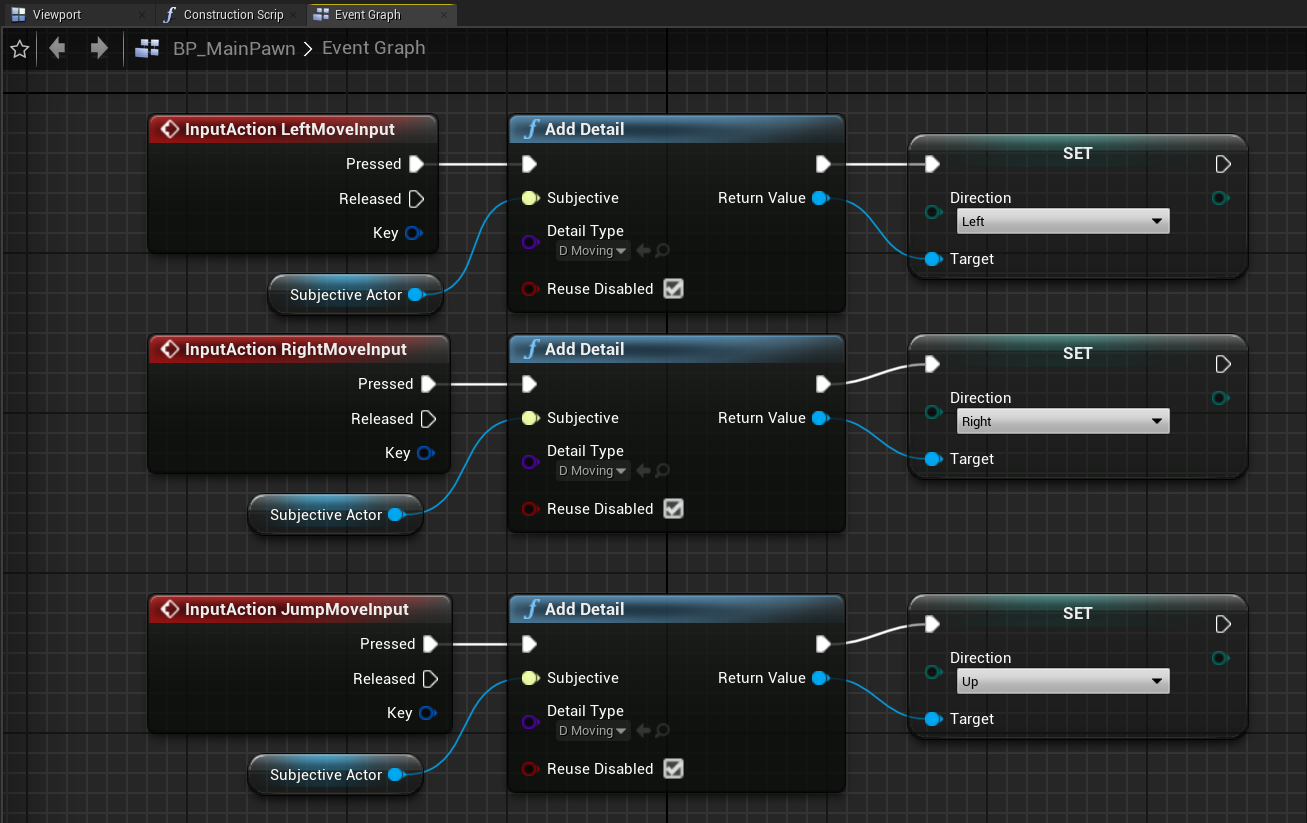
- It“s better to do so in Controller but for brevity let“s do it here. Being in the BP Editor of the „BP_MainPawn“ navigate to „Event Graph“ and add our 3 input events we have declared previously (see step 2 of Implementation). Create the node „Get SubjectiveActor“, drag from it 3 new nodes, which are „Add detail“ and in the Detail Type field choose „D_Moving“. After that you can see the returning type of each node currently is „D Moving Object Reference“. I.e. after the detail was added you can „promote it to variable“ and call functions from it or access variables. In our case we will change the Direction variable to corresponding value. Don“t forget to pin all of the Reuse Disabled checkboxes (We will talk later why you should do so). The whole scheme now should look like so:
- All we have to to do now is to implement the game mechanics in our GameMode. So open the BP Editor once again for the „BP_Mechanism“ and in the Graph view, delete all of the nodes except for the „Event Tick“ node. Promote the
Delta Secondsvalue to a globalGlobalDeltavariable mainly for convenience purposes. Now we need to iterate over all of the subjects and for each of them, check if it complies with our special case. So, for that drag the next node - „Sequence“, and from its first output drag the filament link and find the „Mechanic“ node.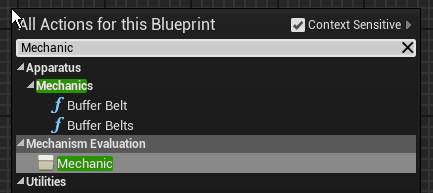
- As you see, „Mechanic“ gets a „Mechanical Interface“ as its input „self“, which is in fact our „BP_Mechanism“ is. This node will iterate over all of the entities (subjects) with a specific set of details enabled/disabled. As how it is from the starts, essentially all of the subjects which will comply with the empty requirements. „Evaluation Body“ pin gets executed for each complying subject. After all of complying subjects were processed, the „Completed“ pin gets executed. RMB-click on the node and in the opened context menu you will see two last items with these titles: „Add Detail Pin“ and „Add Excluded Detail Pin“. You can click these items several times and see that each time you do so, a new pin with a dot or exclamation mark is added to the node. By using this workflow and selecting the detail types in the added inputs you declare an evaluation filter, for the subjects to be processed in the mechanic.
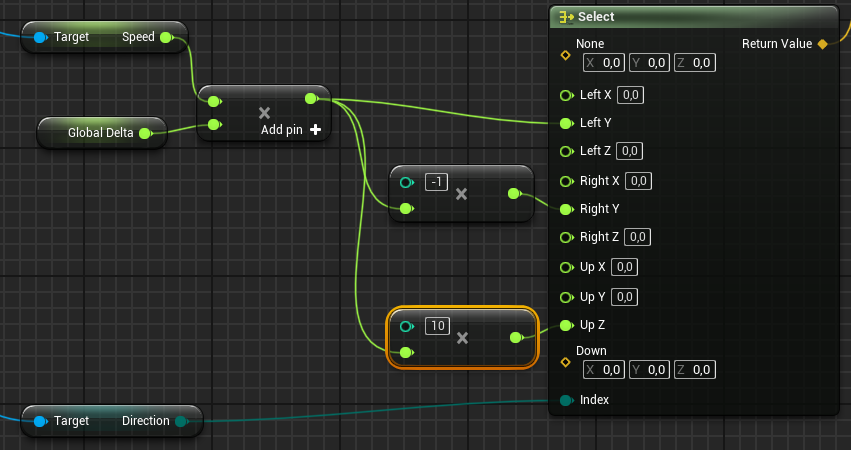
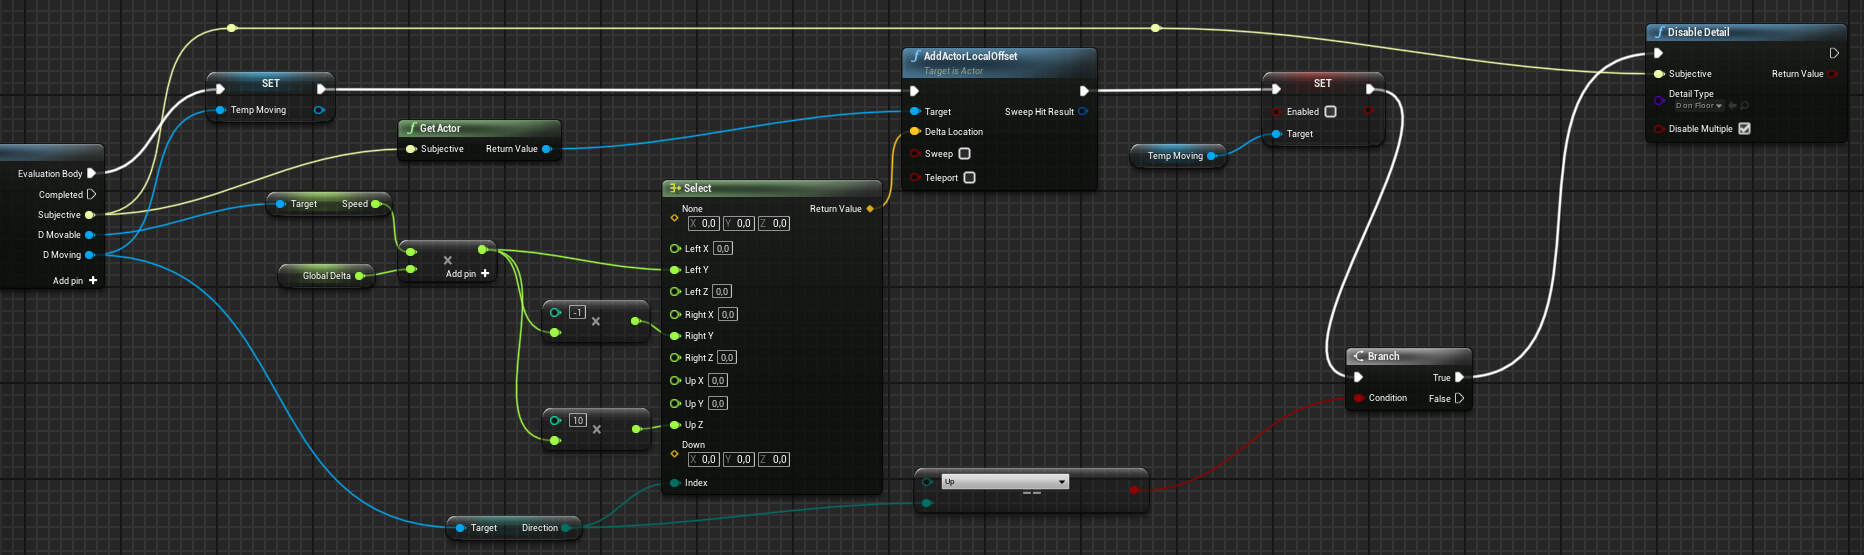
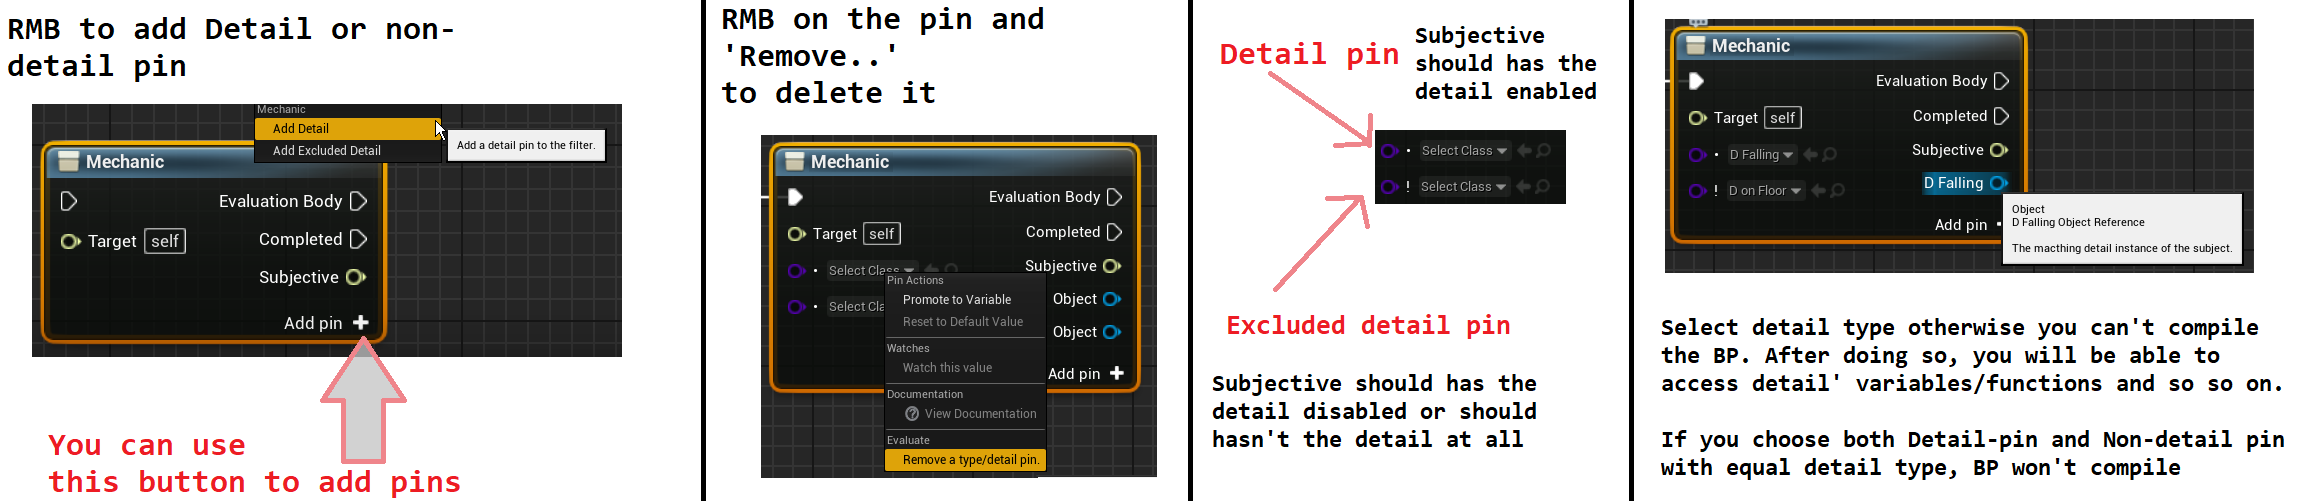 For example, add two including «dot»-pins to the node and delete all of the others (by RMB-clicking on them and selecting the „Remove Detail Pin“ option). Choose their types as Moveable and Moving. Promote the „Moving“ detail to a „TempMoving“ variable - or you“ll get yourself too much «noodles». From the „Subjective“ output pin drag a „Get Actor“ pure function. That is also provided by Apparatus and returns the actor that is currently being processed. From this function“s output drag a „AddActorLocalOffset“ node. From the „D_Moving“ pin drag the „Direction“ variable and make „Select“ block to easily choose the corresponding vector depending on the direction currently active in the detail. „Left and „Right“ cases are split into components and fill the Y-component of the left-side case with the „Speed“ variable obtained from the „Moveable“ detail and multiplicated by the „GlobalDelta“ variable. For the right-side case use the same value just with an opposite sign. Below your „AddActorLocalOffset“ node place the deactivation of the „TempMoving“ detail be setting its state „Enabled“ to false. After all the above actions you should have something like that:
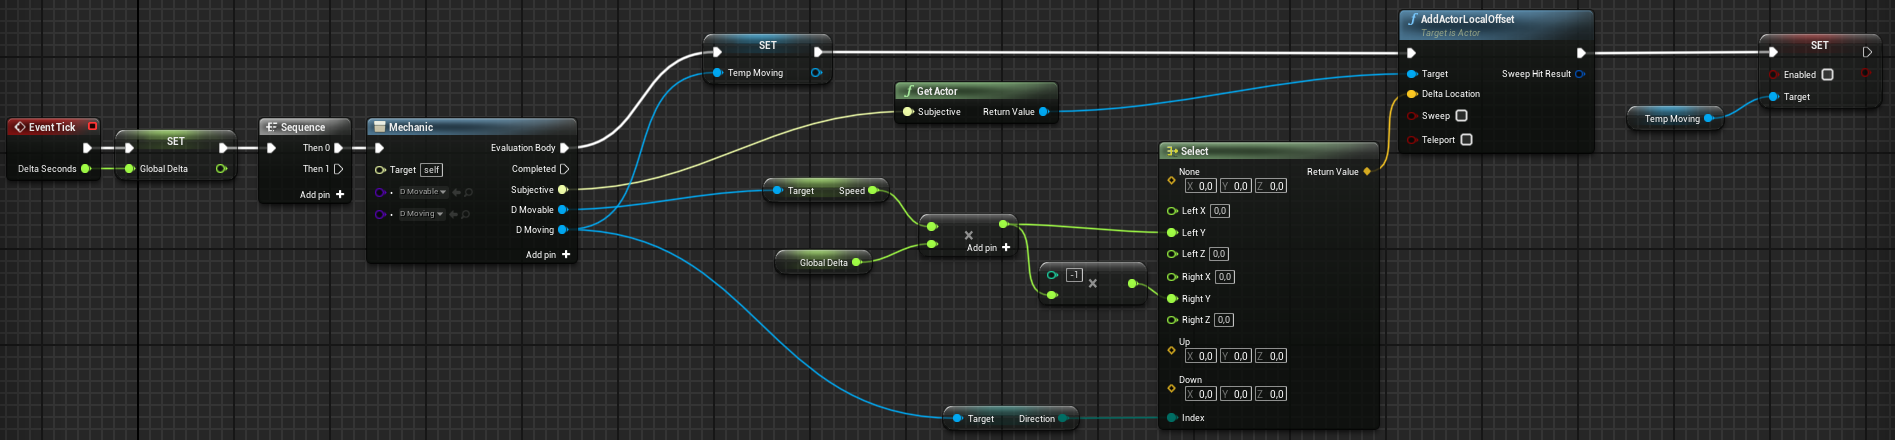 What“s actually going on here? As you may remember, we defined how we determine our keyboard input at some previous step. Here we just move each actor with the pointed details over their local Y-axis (for the camera view, it“s actually moving to the left if Y-axis is > 0 and moving to the right otherwise). So, depending on the direction we obtained from the „Moving“ detail we move an actor across the scene. After doing so, we disable the Moving detail, so it won“t be moving to the side anymore. Good. But what will happen when the player presses a D or a A key a second time? Do you remember the checkbox we pinned? The „Reuse Disabled“ in fact means that if the „Subjective“ has a disabled detail then the function will enable it and return as its output instead of creating a new one. So now you can run the game and check if it works. Use A & D keys to move the box around.
 - Also make a few additional changes and you“ll also be able to jump.
 But the box isn“t falling at all, because we haven“t implemented the necessary logic in our Mechanism. So let“s do that!
 - Go back to „BP_MainPawn“ and a new „BoxCollision“ component to the „DefaultSceneRoot“. Use the following transform:
- Location:
(X=0.000000,Y=0.000000,Z=-13.5) - Scale:
(X=0.400000,Y=0.400000,Z=0.025000). After that in the „Collision“ section select the „OverlappAll“ collision preset. In the „BP_MainPawn“ editor the picture should look like so: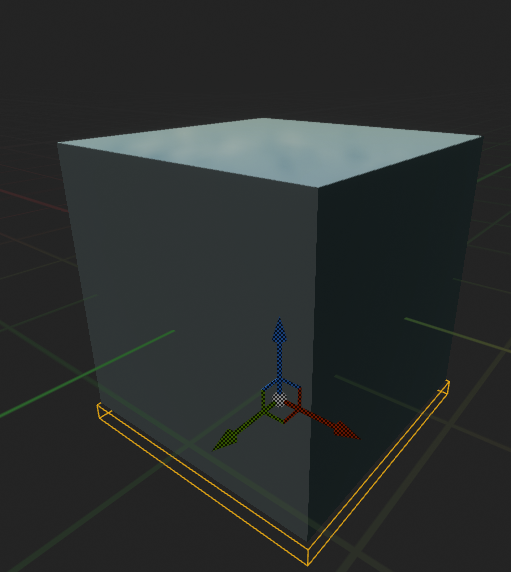
- Now navigate to the Graph and on „BeginPlay“ from „SubjectiveActor“ drag a „Find Detail“ function and set the bottom variable to the box of the pawn:
 We are now assured that our Subjective will have that detail but you should also understand the cases, when the output value of the function should be checked out.
 - Navigate to the level map, select „Floor“→„StaticMeshActor“ and inside its details panel find the property ‘Generate Overlap Events’ and also turn it on.
- In the BP Editor of „BP_Mechanism“ create the next logic block by dragging from the Sequence node to implement the actual falling on the floor:
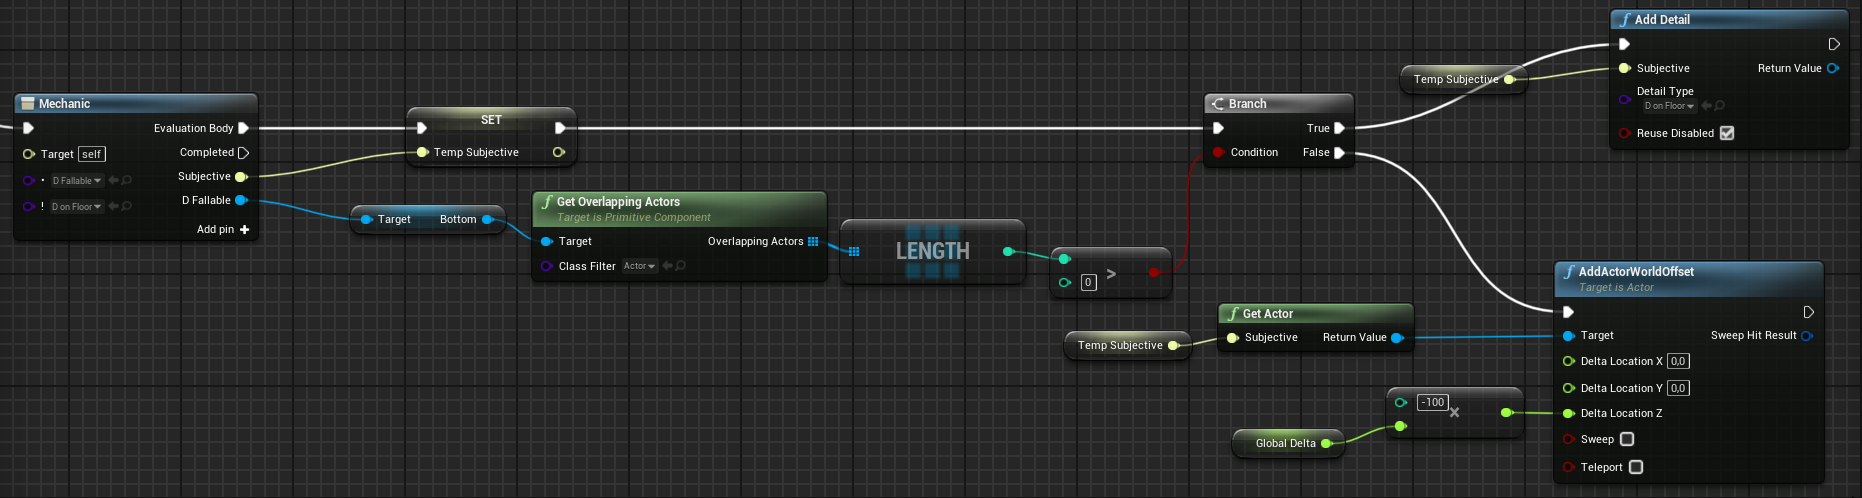 If the Subjective has a „Fallable“ detail enabled AND „On Floor“ disabled and if its“ bottom overlaps with any actor — then we add an „OnFloor“ detail to it, else — continue to move it down (like it“s falling).
 - One last thing — to begin the falling process we need to disable the „On Floor“ detail onсe the Pawn jumps. You can do it this way:
 If the „Direction“ is „Up“ then we disable the detail by using the Apparatus function. Now you can both jump and fall. Just like in your real life, unless you“re living on the moon or something.
Results
Anyways, that“s it for this tutorial and the result should look similar to:
Conclusion
Apparatus is a really capable plugin for our beloved UE. It provides us with a bunch of new programming principles and techniques. Those are usually called data-driven since we are more thinking detail-wise than class-wise. You can use our innovative tool in your own game production pipeline and extend its capabilities even further by declaring and implementing your own C++ classes, adhering to the necessary Apparatus interfaces.
The vast functionality of this plugin can“t be easily demonstrated on a tiny tutorial like this one. The main purpose of this article is exactly to introduce the beginners to the ECS approach in general and Apparatus in particular. Check our the following links also and don“t hesitate to ask any of your questions online on our TurboTalk forums and/or Discord server. We are eager to help and your are more then welcome to ask all sorts of questions!