This is an old revision of the document!
Apparatus: Beginner's Guide
In this prolonged tutorial we will talk about using the Apparatus plugin inside Unreal Engine. You will create your first detail and implement the game mechanics in a special Blueprint class. We will demonstrate the most important features on the example of a simple two-dimensional platformer.
Just before going any further, make sure you have a basic understanding of ECS. Check our brief introduction to the ECS concepts.
Plugin Installation (Activation)
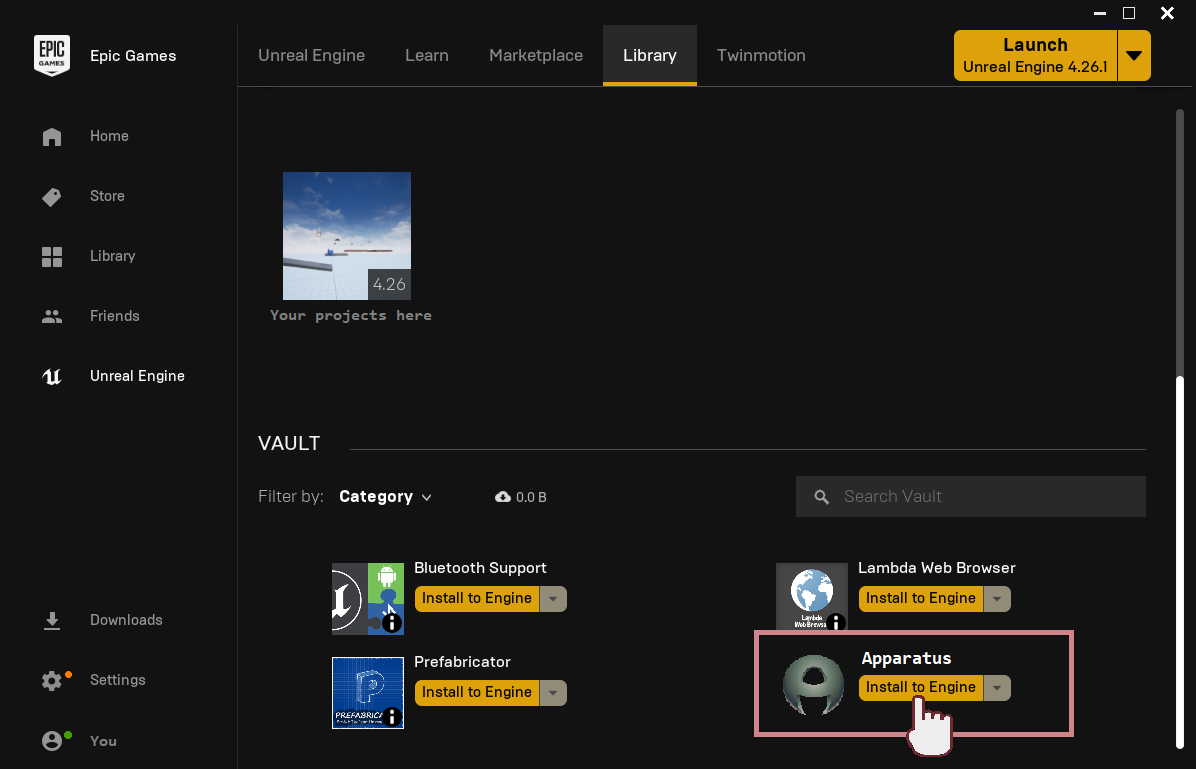
- Before creating a new project, you have to add the Apparatus plugin to the Engine. In order to do that, please, launch the ‘Epic Game Launcher’ and make sure that the ‘Unreal Engine’ item is currently active in the left-most menu. Then, navigate to the ‘Library’ tab on top. Scroll down to the ‘Vault’ section to find the Apparatus plugin along with a yellow button titled ‘Install to Engine’. Press that button to proceed installing.
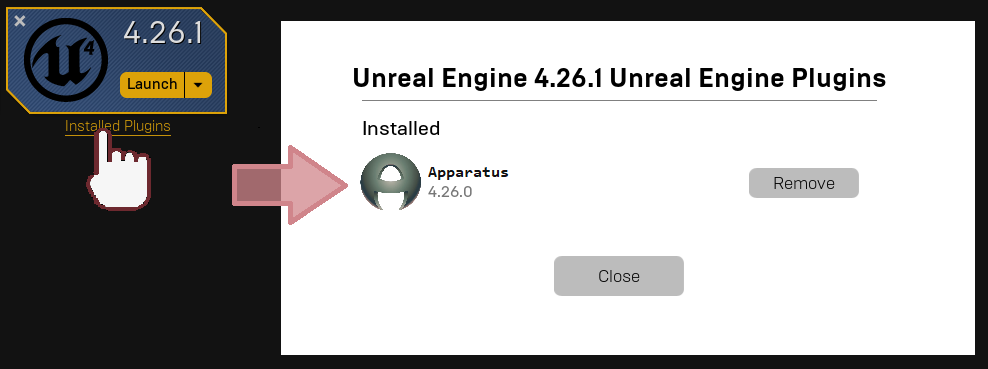
- In the opened section choose the version of Unreal Engine. Note that you should use 4.26.1 (or above) as it’s the only officially supported for now. After clicking ‘Install’ wait for a minute while the launcher loads the necessary files to the engine. When the installation has completed, you can verify its success by clicking the ‘Installed Plugins’ footer under Unreal Engine version you have installed the plugin for.
Project Creation & Initialization
- Now you should Create New Project as usually. Select the blank template, cause we will be building from scratch. Leave the other settings with their defaults. We will name the new project ‘ApparatusLearn’, but you can make up your own title if you want.
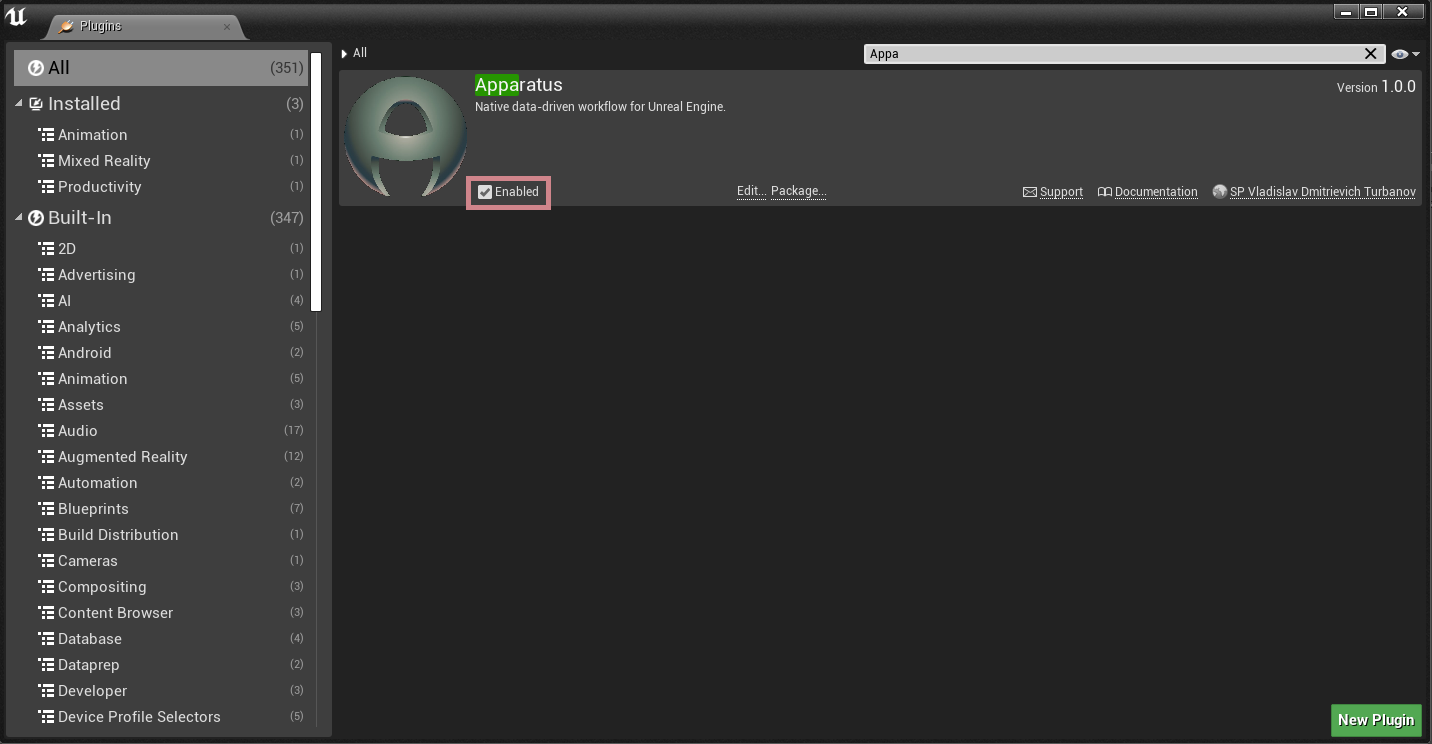
- After the project is created and opened, you can check if the plugin is currently in use: in the uppermost main menu panel choose ‘Edit’ → ‘Plugins’. Then type ‘Apparatus’ in the search box (or navigate yourself to a Workflow category) and make sure the plugin is enabled:
Implementation
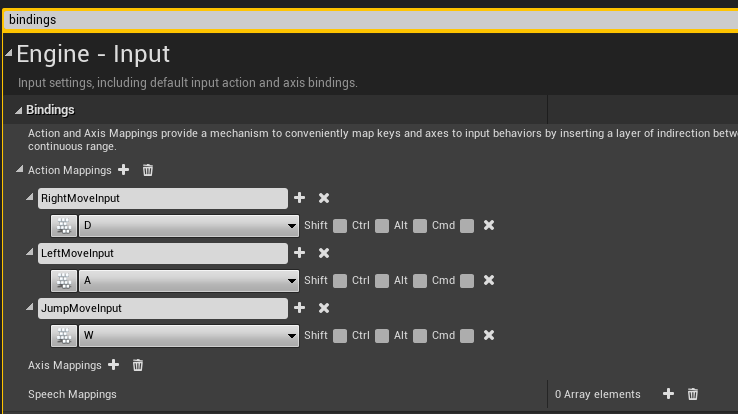
- Ok, now. First of all we need to create a key binding so we can understand, when we should add the necessary details to the actor. In order to do that, go to ‘Edit’→‘Project Settings’ and type ‘bindings’. Focus on the list of ‘Action Mappings’ and add the following keys:
- ‘RightMoveInput’ – keyboard key D
- ‘LeftMoveInput’ – keyboard key A
- ‘JumpMoveInput’ – keyboard key W
- The result must be something like that:
- We proceed with creating a new Pawn Blueprint. In order to do that click green button ‘Add/Import’ in the ‘Content Browser’ and select ‘Blueprint Class’→‘Pawn’ and give it a name ‘BP_MainPawn’ (for a sane naming convention practices, please, check this style guide). While selecting the Blueprint in the ‘Content Browser’ press Ctrl+S to save the newly created item. Now open it by double-clicking on its thumbnail (if you are really new to Content Browser, we’re advising you to read the official Manual). Navigate to ‘Event-graph’ and delete all the nodes by Ctrl+Alt and Del. You should also understand how to use Blueprint Editor; hereinafter BP).
- In the BP Editor switch to Viewport and in the 'Components' section add a ‘StaticMesh’. In the 'Details' panel on the right pick the ‘Cube’ model for the ‘Static Mesh’ property. For our pawn to look even prettier, choose the ‘BrushedMetal’ material as the ‘Element 0’ property value. Add a ‘Subjective Actor’ component (this is actually provided by the Apparatus plugin) to your Pawn and look into the Details Panel to become more familiar with the new Actor Component. During this guide we will only use the properties under the ‘Details’ section:
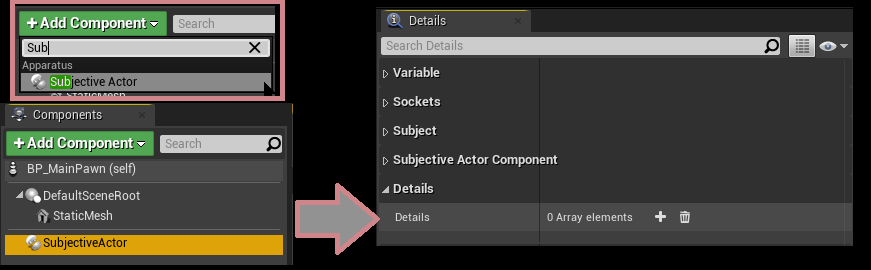 As you may have already understood, we will add our own details in there.
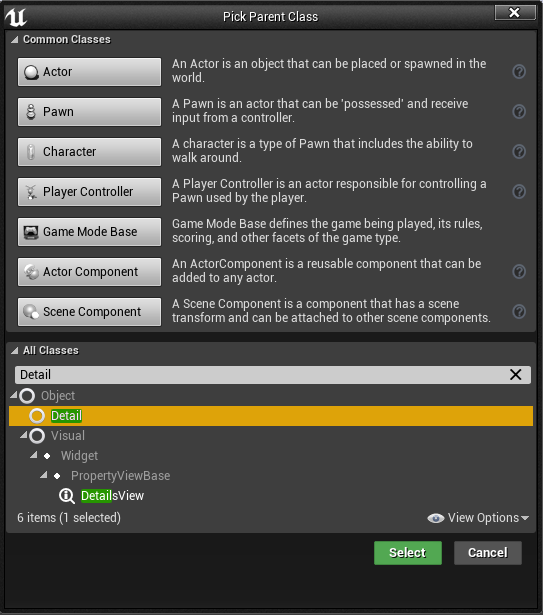
 - Ctrl+Shift+S to save everything, and compile the BP. Once again open the Content Browser and start creating a new BP, but this time you should expand the ‘All Classes’ pane and find the ‘Detail’ class type there:
 You can also use the Create Advanced Asset section of the Content Browser’s context menu (accessed using the right-mouse-button):
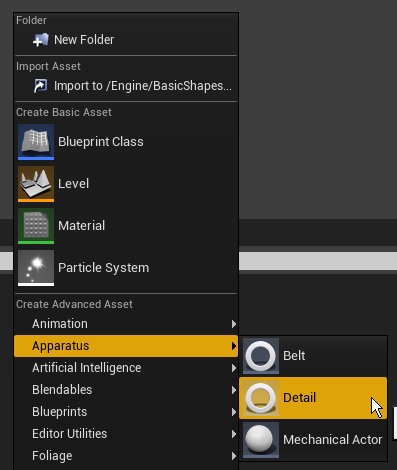
- Generally speaking, you can and shoudl create as many details as you want, but for the tutorial sake we need specifically the following:
D_Moveable,D_Moving,D_OnFloor,D_Fallable.
- Keep your project organized and move all the Details classes to some folder called ‘Details’. Open any detail you want in the BP Editor. As you can see, Apparatus’ detail is actually a usual Blueprint class, inside which you can declare variables, macros and functions as you please. There are also two events that you can override (‘Activated’ & ‘Deactivated’) which are called when the detail’s Boolean state ‘Enabled’ is set to either true or false. In the corresponding details add next variables:
- Float ‘Speed’ to the
D_Moveableclass with a default value of100.0. - Editable enum
ETouch Swipe DirectionnamedDirectionto theD_Movingclass. - Editable & exposed on spawn Box Collision Object Reference named ‘Bottom’ to the
D_Fallableclass.
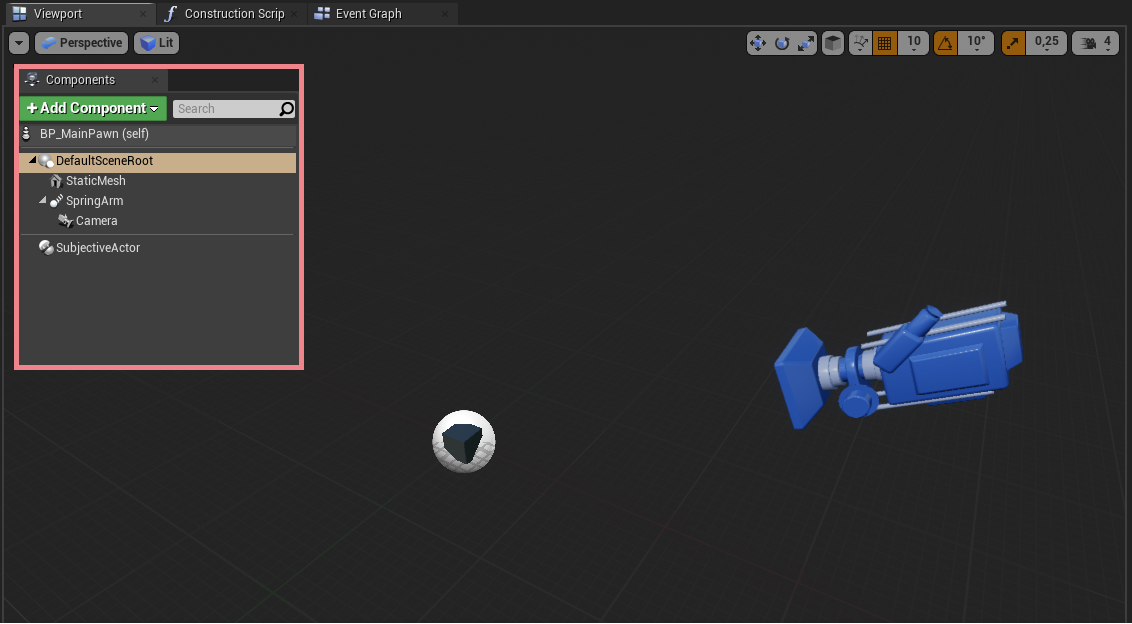
- Go back to the ‘BP_MainPawn’ blueprint and make the cube a little smaller (say,
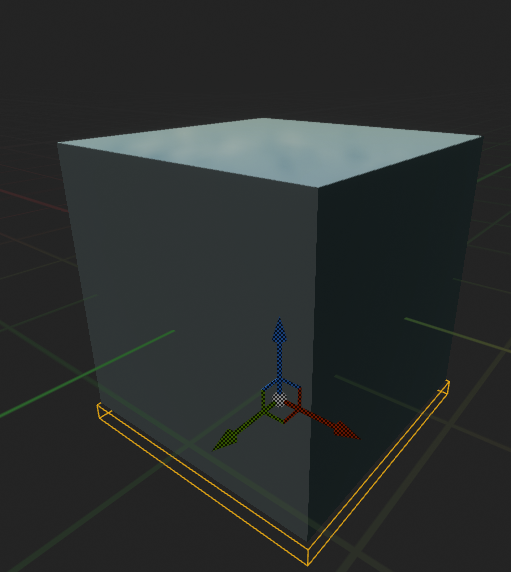
(0.25, 0.25, 0.25)on a vector scale). Add a ‘Spring Arm’ component to the ‘DefaultSceneRoot’ and the Camera to the arm (make sure that transform vectors are set to their default values); then rotate the arm over the Z-axis by 180° and after that rotate it over the Y-axis by -30°. - In the result you should get something like that:
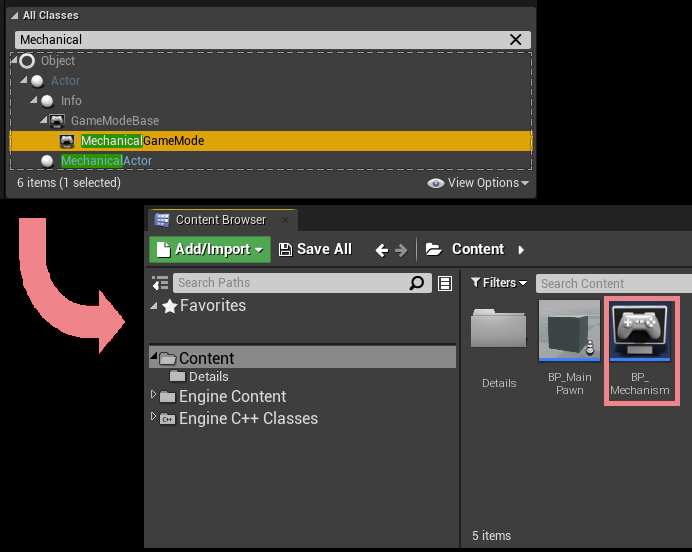
- Create a ‘GameMode’ (or a ‘GameModeBase’) class inherited from ‘MechanicalGameMode’ (or ‘MechanicalGameModeBase’) and name it something like ‘BP_Mechanism’. Like so:
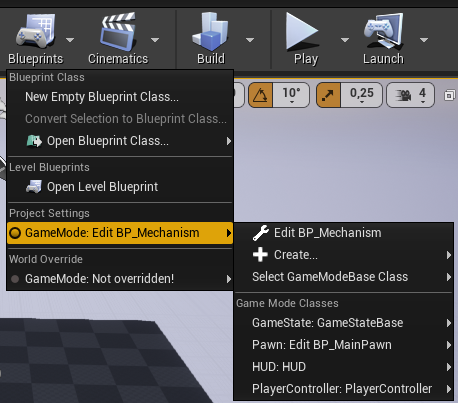
- Open ‘BP_Mechanism’ in the Blueprint Editor and in the Details Panel set the ‘Default pawn class’ value to ‘BP_MainPawn’. Go to the level settings: ‘Blueprints’→‘Project Settings : GameMode’ and select ‘BP_Mechanism’ as the project’s main ‘GameMode’ class:
- Now, if you run the game, you will notice that the camera is actually working, but the cube won’t move while pressing the aforementioned A, D, W keys. Let’s fix this. First, jump to ‘BP_MainPawn’ and in the components list select the ‘SubjectiveActor’ component to see its properties in the Details Panel. For the ‘Details’ property add a new detail by clicking on the
+button and selecting the detail class. Add exactly two details like on the following shot: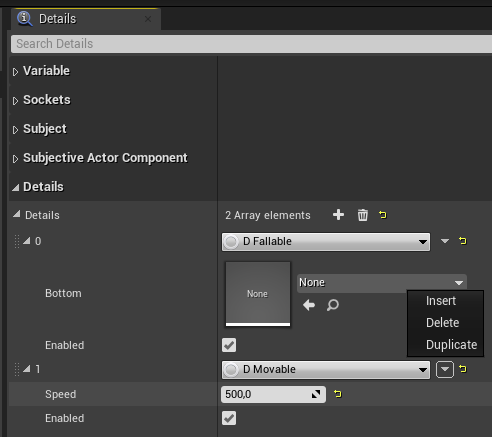
- As you see, you can easily add or remove details from the ‘BP_MainPawn’ actor component; it doesn’t actually matter how they are exactly ordered. You’re also able to see the variables of the details and change their default values. Note that if you change the value of the ‘Speed’ in the list, for example, it won’t be changed in the ‘BP_Moveable’ class itself, because here in the list the instances of the detail classes are presented while in the Blueprint Editor of the ‘BP_Moveable’ class you can change the global default values for its properties. Change the speed in right here in the list to 500.
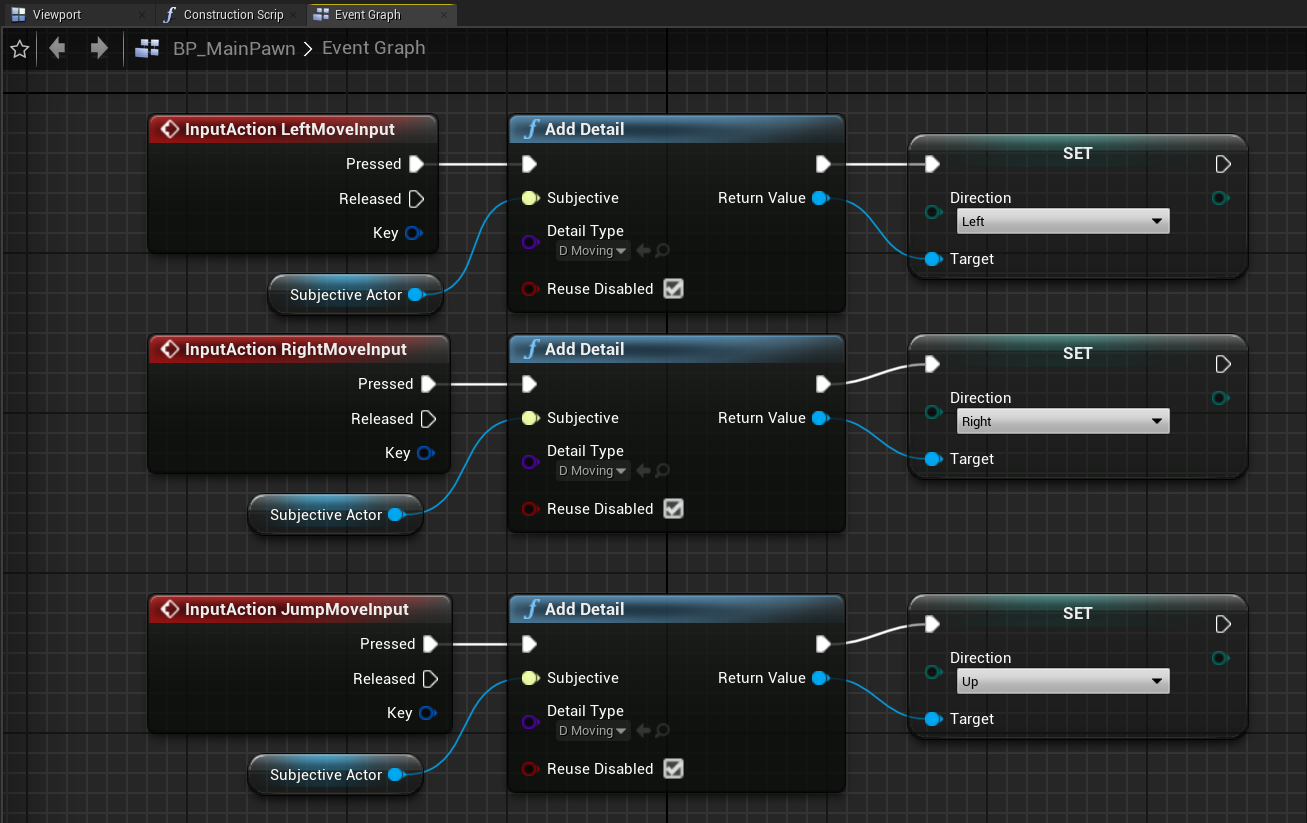
- It’s better to do so in Controller but for brevity let’s do it here. Being in the BP Editor of the ‘BP_MainPawn’ navigate to ‘Event Graph’ and add our 3 input events we have declared previously (see step 6). Create the node ‘Get SubjectiveActor’, drag from it 3 new nodes, which are ‘Add detail’ and in the Detail Type field choose ‘D_Moving’. After that you can see the returning type of each node currently is ‘D Moving Object Reference’. I.e. after the detail was added you can ‘promote it to variable’ and call functions from it or access variables. In our case we will change the Direction variable to corresponding value. Don’t forget to pin all of the Reuse Disabled checkboxes (We will talk later why you should do so). The whole scheme now should look like so:
- All we have to to do now is to implement the game mechanics in our GameMode. So open the BP Editor once again for the ‘BP_Mechanism’ and in the Graph view, delete all of the nodes except for the ‘Event Tick’ node. Promote the
Delta Secondsvalue to a globalGlobalDeltavariable mainly for convenience purposes. Now we need to iterate over all of the subjects and for each of them, check if it complies with our special case. So, for that drag the next node - ‘Sequence’, and from its first output drag the filament link and find the ‘Mechanic’ node.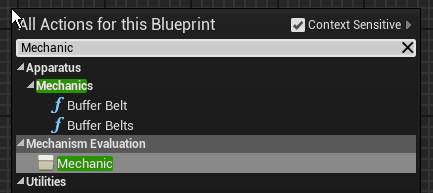
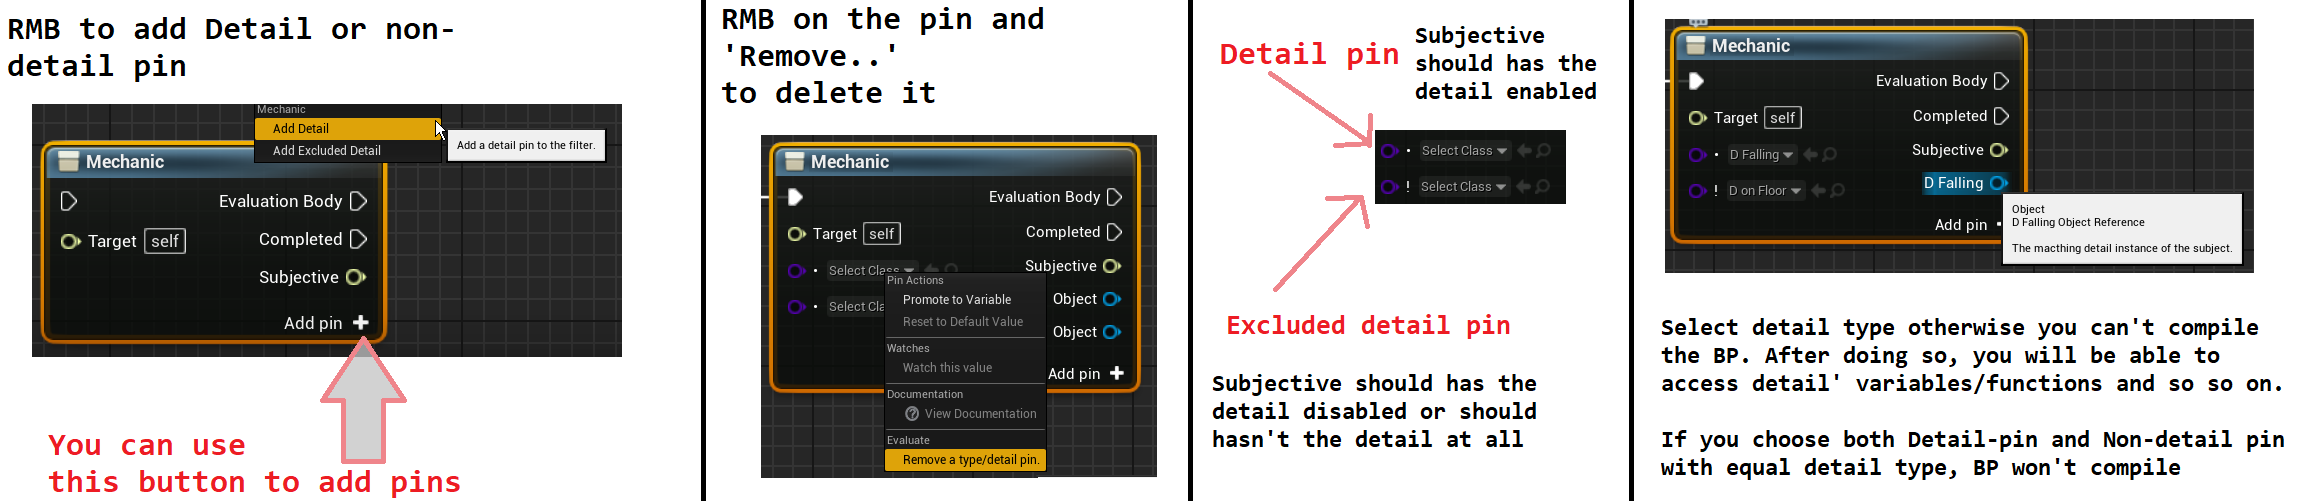
- As you see, ‘Mechanic’ gets a ‘Mechanical Interface’ as its input ‘self’, which is in fact our ‘BP_Mechanism’ is. This node will iterate over all of the entities (subjects) with a specific set of details enabled/disabled. As how it is from the starts, essentially all of the subjects which will comply with the empty requirements. ‘Evaluation Body’ pin gets executed for each complying subject. After all of complying subjects were processed, the ‘Completed’ pin gets executed. RMB-click on the node and in the opened context menu you will see two last items with these titles: ‘Add Detail Pin’ and ‘Add Excluded Detail Pin’. You can click these items several times and see that each time you do so, a new pin with a dot or exclamation mark is added to the node. By using this workflow and selecting the detail types in the added inputs you declare an evaluation filter, for the subjects to be processed in the mechanic.
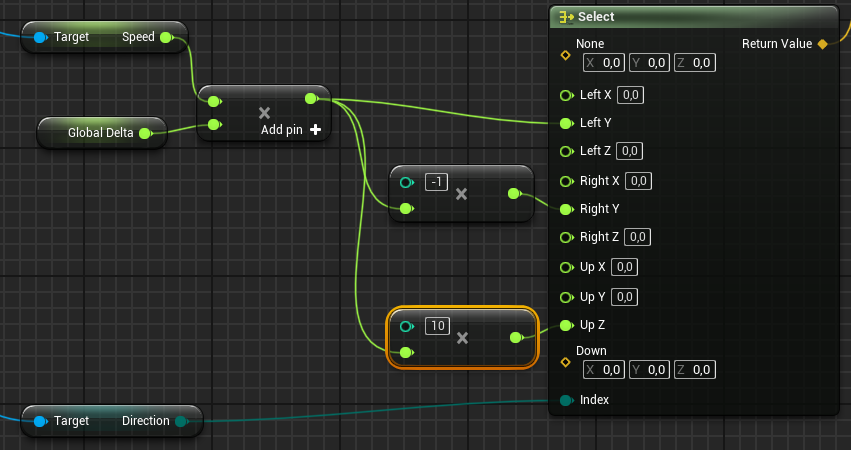
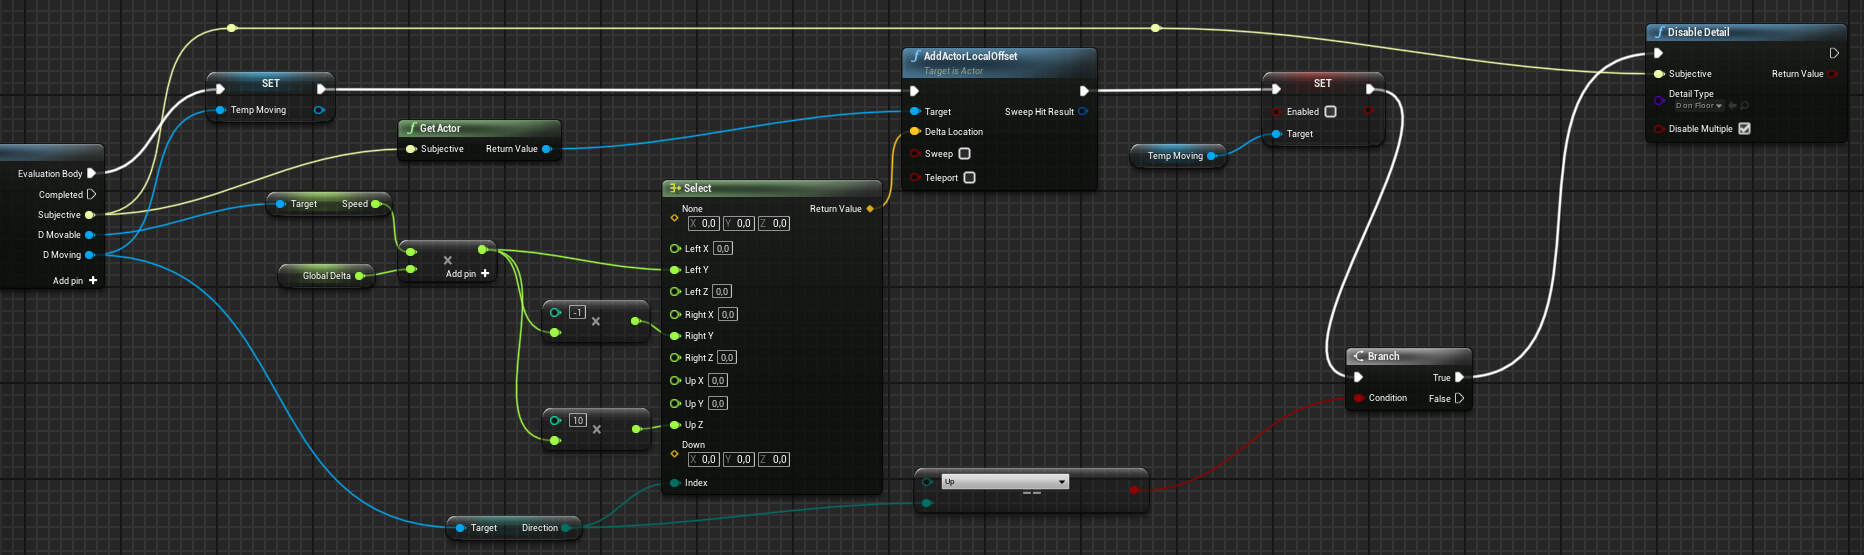
 For example, add two including “dot”-pins to the node and delete all of the others (by RMB-clicking on them and selecting the ‘Remove Detail Pin’ option). Choose their types as Moveable and Moving. Promote the ‘Moving’ detail to a ‘TempMoving’ variable - or you’ll get yourself too much “noodles”. From the ‘Subjective’ output pin drag a ‘Get Actor’ pure function. That is also provided by Apparatus and returns the actor that is currently being processed. From this function’s output drag a ‘AddActorLocalOffset’ node. From the ‘D_Moving’ pin drag the ‘Direction’ variable and make ‘Select’ block to easily choose the corresponding vector depending on the direction active in the detail. ‘Left and ‘Right’ cases are split into components and fill the Y-component of left case with the ‘Speed’ variable obtained from the ‘Moveable’ detail and multiplicated by the ‘GlobalDelta’ variable. For the right-side case use the same value just with an opposite sign. Beyond the ‘AddActorLocalOffset’ place the deactivation of ‘TempMoving’ detail be setting its’ variable ‘IsActivate’ to false. After all the actions you should reach something like that:
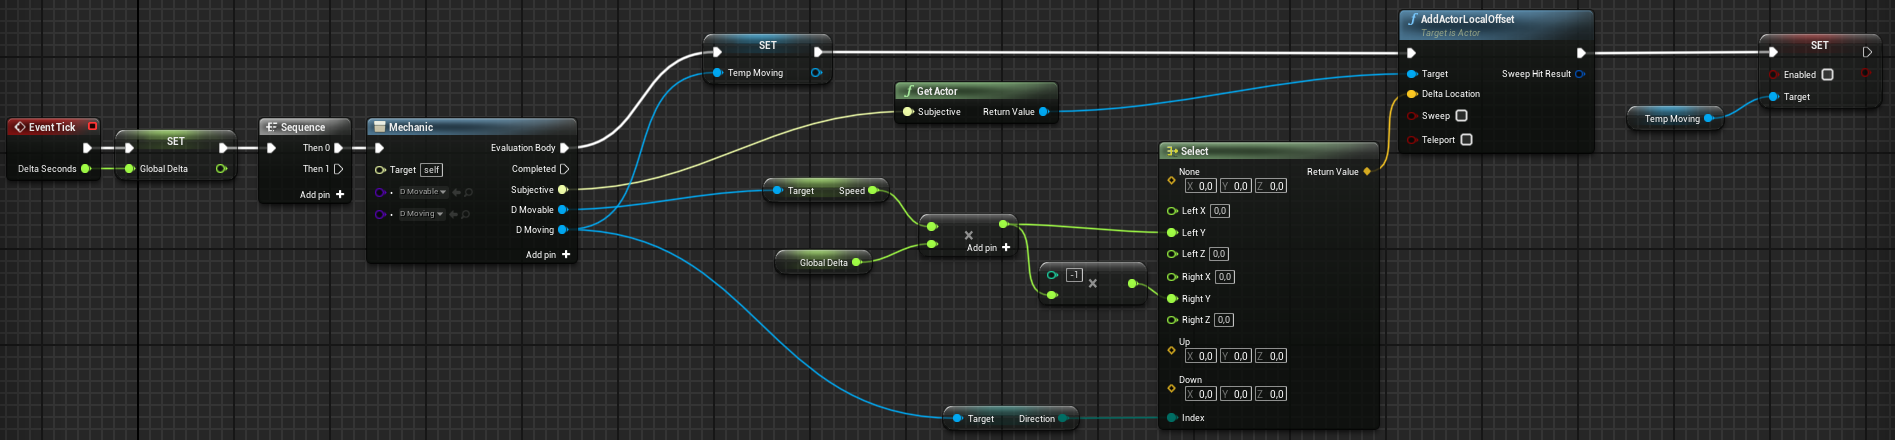 But what is going here? As you remember, we defined how we determine out keyboard input at the step 18. Here we just move each actor with the pointed details over its’ local Y-axis (for the camera view, it’s actually moving to the left if Y-axis is > 0 and moving to the right otherwise). So, depending on what the direction we obtained from the ‘Moving’ detail we move the actor across the scene. After doing so, we disable the Moving detail, so it won’t be moving to the side forever. Ok, but what will happen when the player will press ‘D’ or ‘A’ button the second time? Remember the checkbox we scored. ‘Reuse inactive’ in fact means that if the ‘Subjective’ has the disabled detail then the function will activate it and returning as its’ output. So now you can run the game and check if it works. Use ‘A’ & ‘D’ keys to move the box around.
 - Make a few changes: and you can jump.
 But the box isn’t falling. Because we haven’t declared necessary logic in Mechanism. So let’s do that!
 - Move back to ‘BP_MainPawn’ and add to ‘DefaultSceneRoot’ new component ‘BoxCollision’. Use next transform:
- Location (X=0.000000,Y=0.000000,Z=-13.522278)
- Scale (X=0.400000,Y=0.400000,Z=0.025000). After that in the ‘Collision section’ select ‘OverlappAll’ collision preset. But in the ‘BP_MainPawn’ editor the picture should be:
- Now navigate to Graph and on ‘BeginPlay’ from ‘SubjectiveActor’ drag ‘find Detail’ function and set the bottom variable to the box of the pawn:
 We are ensured that out Subjective will have that detail but you should understand the cases, when the output value of the function should be checked out.
 - Navigate to the level, choose ‘Floor’ ‘StaticMeshActor’ and inside its details panel find the property ‘Generate Overlap Events’ and turn it on.
- In the BP editor of ‘BP_Mechanism’ by dragging from sequence create next logic to provide falling on the floor:
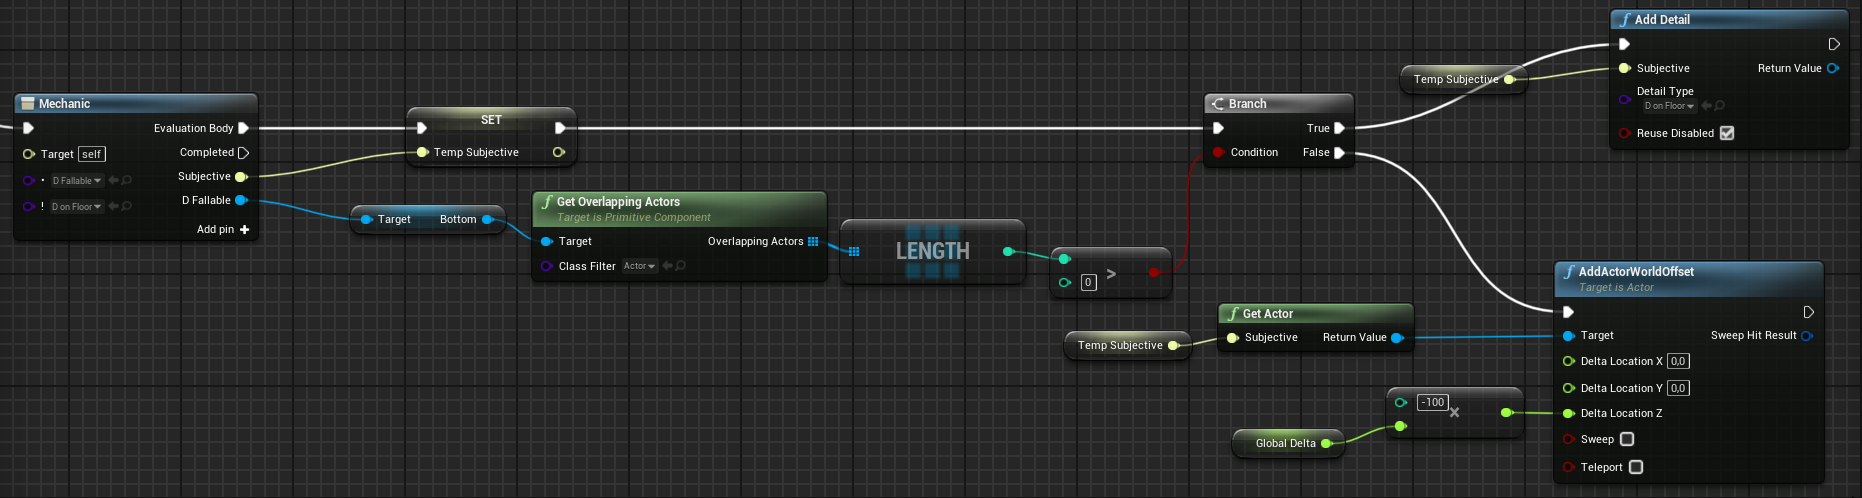 If the Subjective has enabled detail ‘Fallable’ & disabled detail ‘On Floor’ and if its’ bottom overlaps with any actor — then we add to it a detail ‘OnFloor’, else — move it down (like it’s falling).
 - And the last one — to begin the falling process we need disabling the detail ‘On Floor’ from the Pawn when it jumps. You can do it in that way:
If ‘Direction’==‘Up’ then we disable the detail by using Apparatus function. Now you can jump and fall.
Conclusion
Apparatus is a really nifty plugin for our beloved UE, providing us with a bunch of new programming principles and techniques. You can use it in your game development production pipeline and extend its capabilities even furtherby declaring and implementing your own C++ classes, adhering to the necessary Apparatus interfaces.
The whole functionality of the plugin can’t be demonstrated on a little tutorial like this, but the main purpose of this article is exactly to introduce the beginners to the ECS approach and some of the main features of Apparatus!